4.30.2013

Just Because

{DISCLAIMER - if you don't like feet, you may wanna skip this post!}

     I was going over the old blogaroo tonight after a failed search on Netflix (need to put off studying for finals as long. as. possible...ugh), and realized that it's kinda dusty. While I think the Technique Thursday posts have livened things up a wee bit, things are still looking pretty drab around here. Pretty much all of my posts within the last, oh, at least four months, have been for either design team work, or an occasional challenge.
     So I thought to myself, "Darn it, Clare! You should post something just because!"
     And so here I stand.
     Er, sit.

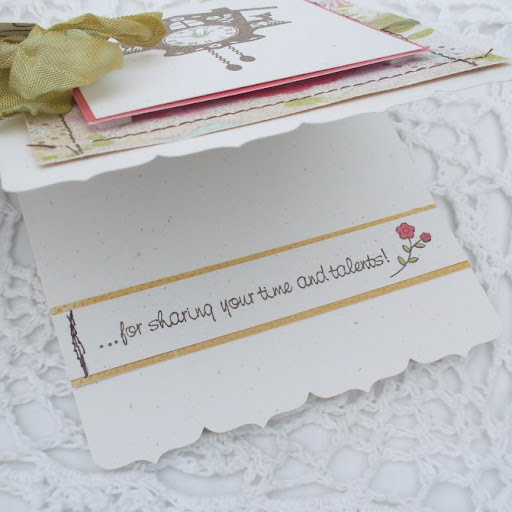
     While looking for the perfect random card to post, I found this...


     I dare you to find a more random, customized handmade card online that looks as sweet as this (in my personal opinion). Dare you.

Backstory:
     Here at my college, Franciscan University of Stuebenville, we have THE best athletic trainer and S.M.A.'s (Sport Medicine Assistants). Seriously. The best. This trainer lady is always in a good mood, treats even opposing players like they're V.I.P's (which is how it ought to be), and keeps me and the rest of the student-athletes laughing. Not to mention, she (and the S.M.A.'s) are pretty darn good at their work.
     Anyways, this awesome trainer lady and the S.M.A.'s taped up my pathetically pathetic ankles up for every practice and every game this past volleyball season, and they did a bangin' job.
     So this was my thank you card (which was accompanied by some sweet treats) for the S.M.A.'s. It's only appropriate. ;)
    The trainer lady thank you card (which is also pretty darn awesome) will be posted soon.


     And yes, I did print out an outline of a foot, and wrap it with thin computer paper. ;)

     Thus concludes my just because card post. ;)
     Thanks for putting up with my today, and God bless!

Throwback Tuesday #7

I hope you've been enjoying the posts so far - today I have one of the first cards I made for GCD Studios as a design team member. :)

The deets: every Tuesday, I will post a card that has been sitting in the draft closet too long. At the end of each month, I will randomly select a winner from all the valid challenge entries!
The challenge: link up an old papercraft related blog post, card photo, or post one of your old drafts/pictures! An additional entry will be given to those who comment on the Throwback Tuesday posts for that month.
The prize: a big ol' box stuffed with scrapbooking goodies!
Sorry, but due to crazy shipping costs, this challenge is open to the US only!


The fix: I think this card is pretty cute, and the fact that it could work so well for girls or boys really makes me want to go easy on it. Plus, I had a limited amount of supplies, so, for now, I would maybe stamp a subtle background on the cream panel so it wouldn't look so blank. The chipboard tassels are cute, but they look just a little wonky...I'm not sure how I would fix that now.

Thanks for popping in today and God bless!


********************************
Card recipe
Cardstock: Unknown
Patterned paper: GCD Studios "Fun House"
Stamp: Papertrey Ink
Ink: Staz-on
Chipboard elements, string, and dot: GCD Studios

Tools: hole punch

4.25.2013

Papertrey April Blog Hop Challenge

     This is my second post today - if you're looking for my Precious Remembrance Project Thursday post, just scroll down! :)
     I'm giving the Papertrey Ink blog hop challenge a go again, and here's this month's challenge...


     I have to say, I struggled at first. Do you ever have that experience where you're making a card using a certain technique, and a card you made long ago using that same technique comes back to haunt you? I don't know if that makes sense to you, but that's what I was feeling. I kept trying to tilt my card, but it kept looking like the evil twin of this card I made a year or two ago that had left me with a bitter taste in my mojo-mouth.
     But anyways, I got over it, as you can see...


     For some reason, my camera just doesn't catch navy well - it keeps looking kinda funky in the photos, when it looks so much more hip in real life. ;)


     I'm glad this one turned out decently, because I spend a good chunk of time stamping those flowers (even those I was using the pre-arranged clusters from the stamp set) when I should've been studying, so I would've been pretty annoyed if came out crummy. ;)

     Anyways, I gotta peace out and study (SUMMER IS OFFICIALLY TWO WEEKS AWAY!), so God bless and thanks for stopping in!

**********************************
Cardstock: Strathamore
Patterned paper: Crate Paper "Random"
Stamps: Papertrey Ink "Mini Blooms" and "On the Farm"
Ink: Versamark, Tim Holtz Distress Inks, Tattered Angels
Other: embossing powder (Michaels)

Tools: heat gun

Project Thursday {Flower Tag}

      I'm not gonna lie - I was feeling the pressure to make a project using the flower from Mom and Dad set after seeing the rest of the Precious Remembrance design teams amazing projects using it.
     While I don't know if I'm quite up to par with them, I will admit this project is probably my favorite I've made for this blog so far. The top reason being, how many goodies I was able to stick on one tag, and the three different techniques I used here.
     First, the tag...


      So the first technique; the leaves. I got the adorable wood veneer leaves from Michaels, and smeared them with some pigment ink. To keep the ink from smearing, I coated the leaves with clear embossing powder, which gave them a nice, yummy shine.


And the last two techniques...
      For the flower itself, I used the rock-n-roll stamp technique (which is new to me) on vellum, and to keep the ink from smearing, again, I used clear embossing powder. It gives such a nice, translucent look to the vellum.
      Secondly, those little yellow dots. They were originally cheap, stark white adhesive pearls that didn't match with anything. However, I picked up some cheap nail polish at Walmart, covered them, let them dry, and then stuck them here! Isn't it fun? It kinda gives that look I've been seeing from the enamel dots that are so popular now, except you can customize your dots!
    I'll be posting a video of how I did the leaves, flower and gems later on the blog, so be on the lookout for that! ;)


So that's why this project is my fave - what do you think? I'm thinking I might tie this around some kind of  floral gift for my mom, who just loves planting. :)

Thanks for stopping in today and God bless!

4.23.2013

Throwback Tuesday #6

A fun, happy card for today's post!

The deets: every Tuesday, I will post a card that has been sitting in the draft closet too long. At the end of each month, I will randomly select a winner from all the valid challenge entries!
The challenge: link up an old papercraft related blog post, card photo, or post one of your old drafts/pictures! An additional entry will be given to those who comment on the Throwback Tuesday posts for that month.
The prize: a big ol' box stuffed with scrapbooking goodies!
Sorry, but due to crazy shipping costs, this challenge is open to the US only!

My previous thoughts:

The inside...


That sentiment from an old Sugarloaf set (part of my first stamp set kit!) goes so well with this fun cuckoo set from Hero Arts.
The card front...


I accidentally mixed some blue with a gold died ribbon, to get this almost puke green seam binding. Didn't want to waste it though, so I stuck it on this card.


I'm so obsessed with this cuckoo set...love those clocks. :)


The fix: the ribbon! Again! Note to self - if you have messed up ribbon, do NOT use it! The only other thing that stands out to me is the lack of color in the main stamped panel. I think I a little bit of coloring in the image, and maybe a brighter pearl would've helped. But, I do give myself a pat on the back for the inside sentiment - I don't do that nearly enough, and it really spices up cards.

Thanks for stopping in today and God bless!


*************************************
Card recipe
Cardstock: LSS, DCWV
Patterned paper: Crate
Stamps: Image by Hero Arts "Cuckoo", sentiment from Sugarloaf
Ink: Distress Ink "Walnut Stain"
Ribbon: Seam binding
Pearl: Hero Arts

Tools: sewing machine, Fiskars border punch

4.16.2013

Throwback Tuesday #5

A sweet, delicate number up today!

The deets: every Tuesday, I will post a card that has been sitting in the draft closet too long. At the end of each month, I will randomly select a winner from all the valid challenge entries!
The challenge: link up an old papercraft related blog post, card photo, or post one of your old drafts/pictures! An additional entry will be given to those who comment on the Throwback Tuesday posts for that month.
The prize: a big ol' box stuffed with scrapbooking goodies!
Sorry, but due to crazy shipping costs, this challenge is open to the US only!

My previous thoughts: 

Some Glossy Accents keeps the lace in place and the roses as well - this stuff is like the cardmakers super glue - love it!


And the handmade postage stamp-like embellishment...


The whole card...


The fix: I like the colors of this card, but the lace looks a little wonky here. I think I might also sneak in some pearls beneath the stamp die cut, just to balance it out a bit. I can't be too harsh with this card though, because it always had a soft spot in my crafty heart. ;)

That's it for today, folks! Thanks for popping in and God bless!


***************************
Card recipe
Cardstock: LSS
Patterned paper: from kit
Stamps: Waltzingmouse "Fancy Phrases"
Ink: Distress Inks "Walnut Stain" and "Worn Lipstick"
Ribbon: Seam binding coral
Flowers: Recollection (Michaels)
Other: pearls (unknown), lace (unknown)

Tools: trimmer, adhesive, scissors, hole punch, Glossy Accents

4.11.2013

Project Thursday {emergency post}

...I hope I didn't scare you with the title, as there's no real emergency except for that, amidst studying for two tests and writing a big paper, I clean forgot to make a new project for today! :(
Luckily for you, however, I have come prepared with a tag I made awhile back - it doesn't use the latest and greatest stamp set (Mom and Dad), but it does use the still fabulously trendy and fun Positive Thoughts set.


I used the stitch border stamp to create the line for the "rain", and then the little hearts for the raindrops themselves. :)


I hope you like my quick little tag, and I'll see you again in two weeks for a prepared post. ;)

blog: bearydocardsinc.blogspot.com

Happy Tenth!

I don't know about you, but the George paper from Special Delivery seemed like a great big splash of summer to me, so I had a ton of fun making a project with it in the middle of winter!


Love the adorable flowers, and the sweet typewriter-esque letters from Spencer...


A few punched out circles from the patterned paper provide a quick scalloped edge for the image! :)

Thanks so much for stopping in today!


Blog: http://bearydocardsinc.blogspot.com/


4.09.2013

Throwback Tuesday #4

Today's post is deuce! That is, two mini cards for one Throwback Tuesday post.

The deets: every Tuesday, I will post a card that has been sitting in the draft closet too long. At the end of each month, I will randomly select a winner from all the valid challenge entries!
The challenge: link up an old papercraft related blog post, card photo, or post one of your old drafts/pictures! An additional entry will be given to those who comment on the Throwback Tuesday posts for that month.
The prize: a big ol' box stuffed with scrapbooking goodies!
Sorry, but due to crazy shipping costs, this challenge is open to the US only!

And now for my old thoughts:

I love THIS set. Love. It.
The sweet mini images, the cute sentiment, the funky frame...pure sweetness.
So I made some mini cards - one cute, one funky.

Cutie.


 ...funky.


Some yummy embossed 'frosting'


The fix: honestly, since these are just wee little note cards, I don't think there is much I would do. I think they fulfill their simple purpose pretty well.

That's it for this Throwback Tuesday post! Thanks for stopping in and God bless!


**************************************
Card recipe 1
Cardstock: Unknown, Bazzil
Stamps: Papertrey Ink, MFS
Ink: Tim Holtz "Walnut Stain", "Shabby Shutters", and "Worn Lipstick", Tsueinko glue pad
Other: Martha Stewart clear embossing power

Tools: Cuttlebug, Nestabilities, heat embossing tool

Card recipe #2
Cardstock: Hero Arts, Bazzil
Patterned paper: October Afternoon "Fly a Kite"
Stamps: Papertrey Ink
Ink: Tim Holtz "Walnut Stain" and "Worn Lipstick"
Other: pearl (Recollection), string

4.07.2013

Hello

I'm here today with my second attempt at Craft Dash's challenge #15 - the first one didn't make the time cut. ;)


I was pretty excited about this color combo - something about that navy in there just spices things up a bit, don't ya think?

And then there's this cool Tuesday Trigger photo for additional color inspiration...


...and now the card that took me 9 minutes and 42 seconds to make...


For some reason, the flower looks peachy in the photograph, which is odd, because I haven't noticed my camera having problems picking up certain colors before. It's actually a nice shabby pink, in real life - the video (below) seems to pick up on this better.


And guess what? I actually edited and uploaded the video 'documenting' this process  - it makes me so happy, because I haven't been able to edit my videos on Picasa since getting my current camera a year and a half ago. I tried Googling my problems, but it was just such a mess, I gave up. So I just recently tried Windows Movie Maker and that seems to be the trick! Plus, for some reason, the edited video uploads way faster on YouTube than the unedited version - weird, right? Anyway, here it is, with minimal editing since I didn't want to spend a lot of time on something that might not work;


Thanks for stopping in today, and God bless!

***************************************
Cardstock: LSS
Patterned paper: Crate Paper
Stamp and dies: PTI
Ink: Stazon
Other: glitter (Martha Stewart), silk ribbon, flower (Maya Road), pearls (Michaels)

Tools: Cuttlebug, dies, Xyron sticker maker

4.04.2013

Dancing to the Charleston

"Charleston, and Charleston. Charleston, and Charleston..." went a swing dance teacher last summer, so while I was making my card using Diane Kappa's new Charleston collection, I couldn't help hearing that play in my mind. ;)


I used many of the elegant patterns to create another pattern of circles to provide the backdrop for this beautiful flower...


Maybe next time you look or play around with this line, you'll have something similar dancing around in your mind. ;)

Thanks for stopping in today! :)


Blog: http://bearydocardsinc.blogspot.com/

4.02.2013

Throwback Tuesday #3

We're starting off April's Throwback Tuesday's off with a bang, people!

The deets: every Tuesday, I will post a card that has been sitting in the draft closet too long. At the end of each month, I will randomly select a winner from all the valid challenge entries!
The challenge: link up an old papercraft related blog post, card photo, or post one of your old drafts/pictures! An additional entry will be given to those who comment on the Throwback Tuesday posts for that month.
The prize: a big ol' box stuffed with scrapbooking goodies! 
Sorry, but due to crazy shipping costs, this challenge is open to the US only!

The card today is just...ugh. And now for my thoughts on it from approximately two years ago. ;)

That ugly bow thing was made with scraps...I didn't mind it before, but looking at the pic, I am so....ewwwww. I accidentally got some brown dye in my blue ribbon, which explains the yucky color.
So, to make up for the yucky ribbon, I added some lovely Websters Pages bloomers. {Sigh} Love. That. Stuff.


The fix: first off, that bow/blob has GOT to go. I cringe just looking at it! The stitching here is also pretty pathetic - I can tell now that I obviously didn't have the tension tight enough. Also, that big button is clashing with those fluffy bloomers. I think I also might want to round the corners of the base, to soften the look up a bit. I'm not crazy now about using huge sentiments on shabby cards - I usually like the focus to be on some pretty mass of things, and then sneak the sentiment in some corner. ;)


**********************************
Card recipe
Cardstock: LSS
Patterned paper: K&Co "Wild Saffron", October Afternoon "Thrift Shop"
Stamps: Waltzingmouse "Fancy Phrases" and "Very Vintage Labels 1"
Ink: Ink It Up!, Tim Holtz Distress Ink "Walnut Stain"
Ribbon: Websters Pages
Pearls: Prima
Button: Websters Pages

Tools: trimmer, adhesive, scissors, sewing machine, Cuttlebug, Nestabilities,

4.01.2013

Welcome Baby

A card I made for the last weeks Paper Smooches SPARKS challenge and Simon Says Stamp Anything Goes challenge...


So, my question is, which picture do you like better? I'm trying to figure out what looks better to others on their computer screens - the white background, or the patterned paper background.


I stamped the adorable elephant image on canvas and colored in with a Memento marker.


That's it for me today - say a couple prayers for me this week, as I have a big paper and two big tests (on the same day)
Thanks for stopping in and God bless!

******************************************
Cardstock: LSS, Hobby Lobby
Patterned paper: American Crafts, Crate Paper
Stamp: Paper Smooches
Ink: Stazon, Memento
Other: ribbon (SilkRibbons4You), pearl (Michaels), canvas