11.30.2015

Soft Aurora Borealis // Hero Arts

I just want to pop in with a fun little Christmas card real quick today.


I was going for an aurora borealis look, using the Winter Scene stamp, but I used a little too much water. I still liked the background so I decided to stick this adorable moose on top. I colored him using my Zig pens, and it was so smooth and easy!


Thanks for stopping in today and God bless!
My sassy little sister (the one who actually pays attention to my cards and gives me helpful [sometimes] criticism) says I should thank you for spending your time here and admiring my creative genius, because it makes me appreciate the wonders of life and the wonders that you are.

SUPPLIES


Cardstock: Hero Arts Earth Mix Layering Papers, Canson
Stamps: Hero Arts Woodland Set by Lia, Hand Drawn Snowflakes Bold Prints, Winter Trees Scene, Merry Cactus to You
Ink: Hero Arts Unicorn, Versamark, Tim Holtz
Other: embossing powder (Martha Stewart), star glitter (Darice), glitter (Martha Stewart) Zig Real CleanColor

Tools: Hero Arts Woodland Set by Lia die cut, Cuttlebug

11.26.2015

Joyful Thanksgiving // Hero Arts

Happy Thanksgiving! Here's a real quick card for ya - it was my first attempt at THIS card for the Hero Arts blog. I wanted a brighter version for the blog, but I decided this one was still worthwhile to share.  :)


That's all for my today - I hope you're enjoying this lovely weekend!(and maybe finding some great online crafty Black Friday deals ;))

SUPPLIES


Cardstock: Canson
Stamps: Hero Arts Color Layering Dimensional Bird and Have a Joyful Thanksgiving
Ink: Hero Hues Metallic Cubes, Winter Greens by Lia, Garden and Early Spring
Other: Cubic Background Stencil, Hero Arts gems

Tools: Cuttlebug, Color Layering Dimensional Bird dies

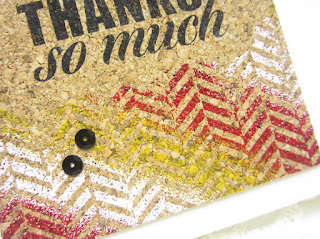
Smelly Cork // Throwback Thursday

I tried experimenting with different stamping materials a couple years ago, for a Paper Crafts call. Today's card is the disastrous result of one such attempt.
Guess I better stick with paper.

****************************************

Some funky embossing on cork - man, it gives off such a funny smell when being heated!


Yep, I don't like this card either.
I thought it'd be worthwhile to show you my pathetic attempts though, if only to warn you about the funky smelling cork.

Thanks for stopping in and God bless!

SUPPLIES

Cardstock: Strathamore
Stamps: Hero Arts "My Happy" and "Made with Love"
Ink: Versamark, Stazon
Other: sequins (Michaels), embossing powders (Martha Stewart), cork (Joann Fabrics)

Tools: heat gun

11.25.2015

Scene Masking + VIDEO // Papertrey Ink

I knew I had to play along with this month's Papertrey Ink blog hop once I got my new stamps in - the Winter Woods stamp set is quickly making itself one of my all time favorite stamp sets.
Here's the inspiration pic...


Since I am sorely lacking the birthday cards department, I thought I'd make birthday cards for the hop - plus, that sentiment really is so pretty.


I didn't have any music note stamps, so I drew them in myself with a Micro pen.


This second card is full on Peacock Feathers ink - I love how easily this card is to change up.


And a video for you! I actually filmed it just this morning, probably the shortest one on record - about half hour! I rarely make cards that fast, much less while filming!


If you are having problems viewing this video, please try watching it HERE on YouTube.

Thanks so much for stopping in and have a beautiful day! God bless!

SUPPLIES

Cardstock: Canson, Bazzill
Stamps: Papertrey Ink Winter Woods
Ink: Hero Arts (black, mint julep), Tim Holtz (peacock feathers)
Patterned paper: Dear Lizzy

Tools: masking tape, circle die, Cuttlebug

11.23.2015

Quick & Easy Plaid Stamping // Hero Arts

I'm on the Hero Arts blog today with a video and two cards, using the easiest way EVER to stamp a plaid background. Here's one of them;


I have to apologize for the poor pics - the winter lighting is tough for me to adjust to, and there's also a smaller window to get this lighting. Hopefully I'll find a solution soon!

Thanks for stopping in and God bless!

11.19.2015

Quick Christmas // Throwback Thursday

I'm a winter baby, but I'll be honest with you - I despise winter. The only good thing about it (in my eyes) is Christmas.
So here's a Christmas card to cheer me up during this gloomy winter weather.

****************************************

A fast and easy Christmas card - patterned paper, stickers, pearls, stamped sentiment and bam! Christmas card.


Thanks for stopping in and have a lovely day!

SUPPLIES

Cardstock: LSS
Patterned paper: SEI "Field Notes"
Stamp: Hero Arts "Merriest Christmas Wishes"
Ink: Stazon
Other: glitter sticker (K&Company), border sticker (Crate Paper), pearls (Michaels), vellum (Hobby Lobby)

11.18.2015

Northern Lights Scene // Hero Arts

I don't know if I've ever mentioned it, but scene cards are my favorite cards to make, though I don't always have ideas for them. Today's card is an idea that transferred pretty well from thoughts to paper.
Even my critical (in a good way) little sister Rosie liked the card - she asked me for it as soon as she saw it, so that's why I'm linking this up with Jennifer McGuire's Handmade Kindness kids challenge, and also for the Simon Says Stamp Wednesday Christmas challenge.


I was going for a Northern Lights kind of thing, though it's definitely harder to tell in the photograph than in real life. The watercolor cardstock I used was pretty old - I use a simple sheet protector to stash my cardstock scraps and pieces, and for this card, I pulled out a piece that was at least a couple years old and had a little bit of blue painting on it already.
I used a mix of Distress Inks and Tattered Angels to make the night sky, and then used some pearlescent Martha Stewart white acrylic paint to add some white "stars." Then I stamped some extra little stars here and there for some deeper pops of purple.


I added a teensy bit of gray coloring to these adorable bears from Lia.


I covered the entire background with a couple coats of Wink of Stella, and it is SO pretty and shimmery! For the border, I sewed without thread to get the piercings, but if you had a border die/rectangle cutout, you could always use that.

Thanks so much for stopping in today and God bless!

ETA: I'm cleaning out my scrap room bit by bit (I'm probably going to be moving when I graduate this upcoming May, so I'm trying to get a headstart on this now) and have posted lots of stamps HERE. A lot of them I'm offering for free, as long as you pay for shipping and promise them a good home. ;)

SUPPLIES


Cardstock: Strathamore, Bazzill
Stamps: Hero Arts Winter Bear Set by Lia and Joy to the World
Ink: Versamark, Distress Ink, Tattered Angels
Other: white embossing powder (Hero Arts), clear embossing powder (Hampton Arts), Wink of Stella, Zig CleanColor

Tools: Cuttlebug, Hero Arts Winter Bear Set by Lia die, water, sewing machine

11.16.2015

Blog Named Hero Blog Hop // Hero Arts

Today the Hero Arts blog is hopping with A Blog Named Hero!


I had so much fun making this little scene - I can't seem to stop using this wreath stamp! One of the things I love about this multi-step stamp set is that you don't have to stamp every layer. I've already made several cards with this wreath stamp set, and I don't think I've used the second or third layer yet!


I added some glitter to the wreath - this was one of the last things I did to the card, and I was going for more of a snowy glitter look, but I didn't want to have too many textures going on in the card, so I left it at this more translucent glitter.


Again, I used my ombre ink for the wreath, and it adds such a nice little touch. When I use the Hero Arts ombre ink, I have a special way of doing it.
Basically, when I use the ombre ink pads, not only do I do the little stamp "dance" recommended on the Hero Arts website (which is moving your stamp up and down the pad to get a more even ombre look), but I really ink up my stamp.
I press my stamp pretty firmly against the ink pad until I'm sure it's completely covered with ink, then I lightly tap it against the ink pad to even out the ink and prevent the ink from pooling on any particular spot on the stamp. It is especially important to do this if you're stamping on vellum, because the more ink you have on your stamp, the easier it is to slide and smear on the vellum. 


I don't have the brick stencil background, so to create my brick background, I first embossed my brick die into the red cardstock, then I used the die to cut into a piece of thin transparency. I used this transparency as a cheap stencil, and added some more red coloring to the bricks using some Distress Inks. This is a great way to stretch your dies - use them as stencils!

Giveaway - Hero Arts stashed away THREE of the November 2015 My Monthly Hero kits to giveaway to readers of this hop. The winners will be randomly chosen from all of the blog hop comments, across all blogs, received by 11:59pm PST on Sunday, November 22nd. Check the Hero Arts blog for the announcement of the winner on Tuesday, November 24th.

That's it for me! I'm the last stop on the hop, but if you missed any of the other blogs, here is the full hop list!

SUPPLIES


Cardstock: Hero Arts Blush Mix cards, Papertrey Ink kraft, Bazzil black, Michaels white
Stamps: Hero Arts Color Layering Wreath and Build a Wreath by Lia
Ink: Hero Arts Black, Light to Red Royal ombre, Lime to Forever Green ombre, Versamark, Distress Ink
Other: Hero Arts white embossing powder, Martha Stewart glitter, black gem (Darice), ribbon (stash)

Tools: Cuttlebug, Hero Arts Color Layering Wreath Frame Cuts, Papertrey Ink woodgrain impressions plate, My Favorite Things brick cover plate

11.13.2015

Winter Cheer // Hero Arts

I'm over on the Hero Arts blog today, sharing a rather differently colored tree...;)


I'd love it if you stopped by! Thanks for popping in here and have a beautiful weekend!

11.12.2015

Busy Bonjour // Throwback Thursday

I hardly ever use ribbon these days - I wonder if it's just because that "trend" has faded for me, or I just went so overboard with it those couple years that my mojo is still recovering. ;)

**********************************************

Just wanted to put a bunch of random things together, and this is what I came up - an unusual color combo for me, which was fun.


Love this shade of ribbon - it looks so light and fluffy and skylike.


Thought it would be fun to stick in some vellum clouds, just because they're cute.


And then a random sticker tab, just because.


Thanks so much for dropping in - God bless!

11.10.2015

Neon Embossing // Hero Arts + WPlus9

It feels like I haven't played along with a non-design team challenge in forever, so I'm here today with a pretty vibrant and funky card.


I wanted to play with my el cheapo embossing powders in a funky way, so I pulled out some bright cardstock scraps and went to town. The powers are from Hampton Arts - I like their gold, white and clear embossing powders, but their colored embossing powders aren't very crisp (luckily that's okay for this card). They also smell kinda funny, like chalk.


To make sure that the sentiment could be distinguishable from the distracting background, I stamped the sentiment on vellum and framed it with a black cardstock die cut circle. I had the "for everything" banner already stamped from a previous project, but I didn't like how it turned out for that project. However, since this was just a quicky project, I decided to use it - I really love to use up my scraps, imperfect as they are.

This card is for the WPlus9 Get Sketchy #4 challenge, the Simon Says Stamp thanks challenge, and the Simon Says Stamp Monday challenge (neon).

Thanks for stopping in today and God bless!

SUPPLIES


Cardstock: Canson, Bazzill
Stamps: Hero Arts Designer Woodgrain, WPlus9 Hand Lettered Thanks
Ink: Versamark, Stazon
Other: embossing powders (Hampton Arts), sequins (Avery Elle), vellum

Tools: Cuttlebug, Lifestyle Crafts circle dies

11.05.2015

Custom Cut // Throwback Thursday

This card is from May 2013, when I wasn't too lazy to pull out my Silhouette to make cards. Those days are LONGGGGG gone.

****************************

This card was just so darn hard to photograph - the black is so black in real life, but in the photo, it looks blah. So I guess you'll just have to take my word for it that this card is more dramatic IRL. ;)


Some very sparkly Doodlebug gems...


Thanks for stopping in and God bless!

SUPPLIES

Cardstock: LSS, Coredinations
Patterned paper: American Crafts "5th and Frolic"
Other: gems (Doodlebug)

Tools: Silhouette Cameo

11.04.2015

Masked Halo + VIDEO // Altenew

...no, Masked Halo is not the name of some new superhero (at least, not that I know of...), but rather the technique I used for today's cards and video.
The video is me playing along with Altenew's second video challenge.


I used Altenew's Painted Flowers for both cards - goodness, if you could wear down stamp sets to nubs like erasers, I would totally have worn this set down by now.


A sentiment banner from Vintage Roses tops off the card.


Here's the video, starring Masked Halo! hahahaha


Just a quick note of apology for my lack of responding to e-mails, comments, posts, etc - it seems my professors want to make up for fall break, and so I've gotten a load of school work dumped on me this week. Hopefully I can clamber out of it soon...

Thanks for stopping in and God bless!

SUPPLIES


Cardstock: from local craft store, Bazzill (for black)
Stamps: Altenew Painted Flowers and Vintage Roses
Ink: Studio Calico, Tim Holtz, Hero Arts, Versamark
Other: gems (Darice), embossing powder (Hero Arts)

Tools: Cuttlebug, circle die, heat gun, water, paintbrush