Showing posts with label crate paper. Show all posts

4.25.2016

Retro Happy Birthday // Papertrey Ink

It's been awhile since I've had a free moment to play along in a contest or blog hop, so I'm so happy to share this card I made for this month's Papertrey Ink blog hop.


I've wanted to play with the Retro Style stamps for awhile now, so I finally caved a couple months ago and bought them. I have to admit, they're a little overwhelming at first because there's so many layers to the stamp set and SO many different ways to make a card with them, but they're gonna come in handy making masculine cards.


I have to say, the arrow and the sentiment are my favorite parts of this card. I really like the look of detailed sentiments like this, die cut and popped up on foam. The little gems I found on eBay, when I was looking for a cheap clear droplet substitute (I ended up caving on the droplets too, and buying them later haha)

Here's the inspiration photo for the April Papertrey Ink blog hop - I was a little worried at first, as I've never really used this color scheme before, but the challenge proved to be very fun!


Thanks so much for stopping in and God bless!

SUPPLIES


Cardstock: Canson, stash
Patterned paper: Crate Paper Bloom, Bazzill Wayfarer
Stamps: Papertrey Ink Retro Style Birthday Sentiments
Ink: Versamark, Tim Holtz
Other: gems (eBay)

Tools: Cuttlebug, Papertrey Ink Retro Style dies, Mama Elephant star dies, circle dies

3.01.2016

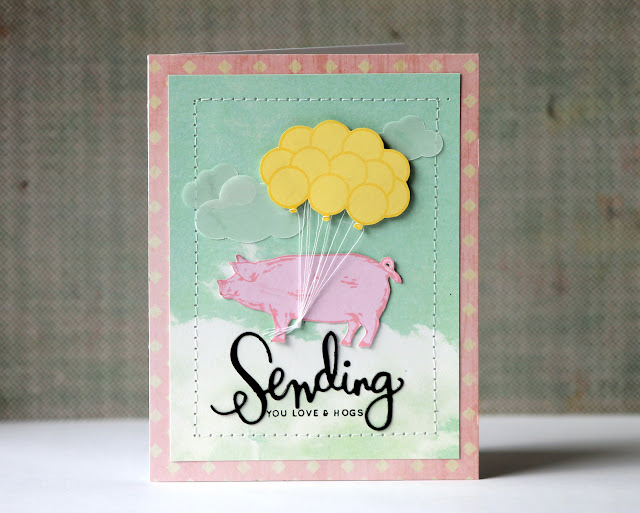
Crazy Pigs // Paper Source

I thought I'd break the monotony of this blog (and my studying for midterms) with some random cards for this weeks Simon Says Stamp Wednesday challenge (anything goes);

My brother got me THIS Paper Source stamp a while back, and I decided to have it do some crazy things...


First, through space! I thought the sentiment would be cheeky and perfect to send to a friend.


This one I struggled with more - I haven't used this much patterned paper in forEVER!

Thanks so much for stopping in and God bless!

SUPPLIES


Cardstock: Canson
Patterned paper: Crate Paper
Stamps: Paper Source Pig, Simon Says Stamp Sending and Wishing and Mama Elephant True Friend and Up and Away
Ink: Tim Holtz, Versamark, Versafine
Other: string, embossing powder (Hero Arts)

Tools: Fiskars cloud punches, sewing machine, Cuttlebug, Simon Says Stamp Wishing die

2.23.2016

Threadless Stitched Border Birthday // Lawn Fawn

I'm going through my last midterms ever right now, so today's post is a quickie...


I wanted to see how the robot would stamp and color on fabric, so I played with that. Then I colored a Studio Calico wooden die cut, and made a custom "ticket" to settle the image and sentiment on.
For the border, I simply stitched the cardstock without using thread - this is one way to get that punched/dotted look that a lot of dies have.


This card is for the Lawnscaping Celebration #124 challenge.


Thanks so much for stopping in and God bless!

SUPPLIES


Cardstock: Canson
Patterned paper: Crate Paper
Stamps: Lawn Fawn Beep Boop Birthday
Ink: Stazon, Versamark
Other: wood veneer (Studio Calico), fabric (stash)

Tools: sewing machine, Cuttlebug, Lawn Fawn Beep Boop Birthday dies

2.17.2016

Die Cut Border Card Set // Avery Elle

I have a fun card set to share with you today, the result of trying to make one unblemished card.

This first card is actually the last card I made, the one look that I was going for.


However, I didn't want my cutting and embossing on the previous cards to go to waste, so with some creative layering (i.e. vellum clouds, sequins), I was able to finish the first three.


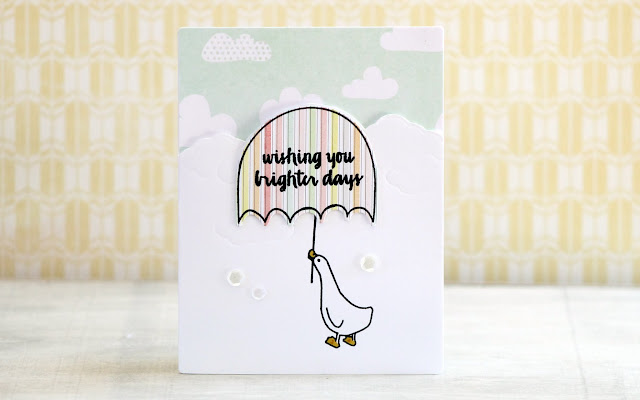
I took the clouds from the Weather It stamp set coordinating dies, and embossed them into the card base using a Spellbinders tan mat. I then cut around the clouds, getting a sort of window card? Hm, not exactly sure what you'd call this kind of card...;)
I was inspired by the look of the clouds in THIS pin. Embossing with your dies is a great way to get some more use out of dies. 


Of course, THIS little goose was just dying to use THIS umbrella.


They all have such different looks, despite having the same layout. Which one is your favorite? I think I might like the last one best.
This was such a fun way to use up some more patterned paper - I can't even believe how little I use it these days!
This is for the AEI{heart}U Friendship challenge (click on the badge to go to the challenge)


For a chance to win a $30 Altenew gift card, please visit THIS post.
Thanks so much for stopping in and God bless!

SUPPLIES


Cardstock: Michaels
Patterned paper: American Crafts Crate Paper and Dear Lizzy
Stamps: Avery Elle Storybook and Weather It
Ink: Versafine, Tim Holtz
Other: enamel dots (My Minds Eye), sequins (Avery Elle), vellum

Tools: Cuttlebug, Avery Elle Weather It and Storybook dies

2.13.2016

Quick Valentine Set // Hero Arts

Today I want to share a quick set of Valentines that I whipped up real quick yesterday for friends. These are so easy to make, quick and they work well for both genders!


This Hipster Animal set is SO fun! I love "dressing up" the animals, and they will be perfect for quick birthday cards, for boys and girls! This stamp set is available at your favorite online stamping store, as well as the Hero Arts store.
Now for a closer look at each individually...


This sentiment actually said "hoppy birthday", but I just made sure not to ink the "birth" part, and it worked for the Valentine.


I die cut tags to go behind the main panel, and you could leave them like that and write a note on the back. However, I wanted them to be little cards, so I cut smaller card bases, and when I went to die cut them, I made sure the die didn't cover them entirely - the left edge of the die didn't touch the cardstock, so when I ran it through my machine, it didn't cut the left edge (the fold of the card)


These cards were a quick use of some larger scraps of patterned paper.


The owl and the bunny are my favorites - what are yours?

I hope you enjoyed these Valentines, and I hope you have a happy St. Valentine's Day! Thanks for stopping in and God bless!

SUPPLIES


Cardstock: Canson Bristol, DWCV (black)
Patterned paper: Crate Paper (assorted collections)
Stamps: Hero Arts Hipster Animals
Ink: Versamark, Hero Arts Clearly Kelly Urban Inks (grey), Black and Strawberry
Other: embossing powder (Hero Arts)

Tools: heat gun, Cuttlebug, My Favorite Things Pierced Rectangle dies, Paper Smooches Quote Tag die

1.18.2016

Neutral Birthday Card // My Favorite Stamps

Today's card is one I had a lot of fun making, and am so pleased with how it turned out, mostly because it's a birthday card (which I seem to always need) that would work for boys or girls!

This card is for the My Favorite Things Sketch 263 challenge and the Marker Pop Challenge #86 Critters.


I colored this adorable bear during the 30 day coloring challenge in November, and finally got around to using him.
I backed the bear and sentiment with several overlapping vellum circles, to balance that side of the card, but to keep it light and airy at the same time, as all the black could be overwhelming.


The stars and present ribbons have some Glossy Accents for a little extra shine.

Thanks so much for stopping in and God bless!

SUPPLIES


Cardstock: Canson
Patterned paper: Crate Paper
Stamps: My Favorite Things Birthday Bears
Ink: Versafine, Versamark
Other: Glossy Accents, vellum, embossing powder (Hero Arts), wooden stars (Studio Calico), Zig Clean Color markers.

Tools: Cuttlebug, My Favorite Things Birthday Bears dies, W. R. Memory Keepers circle dies, heat gun

12.12.2015

Shaker Birthday // My Favorite Things

I'm finished with finals, and now I have a whole four weeks to totally devote myself to making cards!!...and applying for jobs...and hanging out with my family....and baking (LOTS of baking!)

Today's card was started the evening I finished my last final, for the MFT Sketch 258 challenge...


These little pups are so adorable! And they will be perfect for making both young boy and girl cards! I've come to love these sorts of images for my cards much more since I invested in the Zig clean color brush system - it's so dang easy and fun to color with them.


To make sure the sentiment could stand out, I used the Lawn Fawn Chit Chat stamp set - this stamp set works so well with other animal and person image stamp sets. It's even super fun to use by itself! The set and die combo are a rather hefty investment, but Scrap2U (who I'm not affiliated with in anyway, I just had a good experience with) has some great deals on the dies and other stamp/die combos.

A couple things before I go:

  • the sequins I used on this card are the Tequila mix from the sweet Lucy Abrams - THIS is how I organize my sequin/glitter stash.
  • I'll be giving away some brand new Hero Arts stamps and dies over the break, and the first giveaway is over on my Instagram! You don't need to follow me, just leave a comment to be entered to win some fun Clearly Kelly stamps. 
Thanks so much for stopping in today and God bless!

SUPPLIES


Cardstock: Michaels
Patterned paper: Crate Paper Pretty Party
Stamps: My Favorite Things Top Dog and Birthday Bears, Lawn Fawn Chit Chat
Ink: Hero Arts (black)
Other: sequins (Lucy Abram), white and gold paint

Tools: Cuttlebug, My Favorite Things Top Dog, Birthday Bear and Boutique Windows dies, Lawn Fawn Chit Chat dies, paintbrush and water

12.03.2015

Empty Wreath // Throwback Thursday

I'm gonna try to keep this months Throwback Thursday posts relevant to the season, mostly because when this Christmas season is over, these cards are going to be really inapplicable until next season haha.
Today's card was published in the November 2012 CREATE magazine, so this one was quite awhile ago.

**********************************


I have a thing against making wreath cards without putting some kind of something in the center of the wreath. I don't know why, it just seems so naked without it. Call me crazy.


Thanks so much for stopping in today!

****************************
Cardstock: LSS
Patterned paper: Crate Paper 'Emma's Shoppe', October Afternoon 'Sidewalks'
Other: die cut (K&Company), pearls (Recollection), ribbon (stash), glitter (Martha Stewart)

Tools: trimmer, adhesive, scissors, sewing machine, Cuttlebug, PTI Tiny Tags die

11.19.2015

Quick Christmas // Throwback Thursday

I'm a winter baby, but I'll be honest with you - I despise winter. The only good thing about it (in my eyes) is Christmas.
So here's a Christmas card to cheer me up during this gloomy winter weather.

****************************************

A fast and easy Christmas card - patterned paper, stickers, pearls, stamped sentiment and bam! Christmas card.


Thanks for stopping in and have a lovely day!

SUPPLIES

Cardstock: LSS
Patterned paper: SEI "Field Notes"
Stamp: Hero Arts "Merriest Christmas Wishes"
Ink: Stazon
Other: glitter sticker (K&Company), border sticker (Crate Paper), pearls (Michaels), vellum (Hobby Lobby)

11.12.2015

Busy Bonjour // Throwback Thursday

I hardly ever use ribbon these days - I wonder if it's just because that "trend" has faded for me, or I just went so overboard with it those couple years that my mojo is still recovering. ;)

**********************************************

Just wanted to put a bunch of random things together, and this is what I came up - an unusual color combo for me, which was fun.


Love this shade of ribbon - it looks so light and fluffy and skylike.


Thought it would be fun to stick in some vellum clouds, just because they're cute.


And then a random sticker tab, just because.


Thanks so much for dropping in - God bless!

10.12.2015

Real, Live Coloring // My Favorite Things

MIDTERMS ARE OVER!!
Life may now move onward.
Praise be.

Today's card is something a little new for me.
It features coloring.
Real, live, non-watercoloring coloring, folks.

I know, I never thought I'd see the day either.


I decided to make two "risky" purchases - a 36 set of Zig Clean Color Real Brush Pens, and the My Favorite Things Harvest Mice stamp set.
These two were practically a match made in heaven, and I don't regret one cent of my "investments" (I have to call them investments since I'm a senior in college ;))

Anywho, I colored the FREAKING ADORABLE mouse with those lovely brush pens, and I am so. excited.
It's basically my first time coloring an image without using watercolors, and boy, am I loving it. Copics were way too intimidating (and expensive!) for me to get into, but these Zig's...man, I dig 'em.


I mentioned it on Instagram, but Melania Deasy was the one who twisted my arm into buying the stamp set and the window die. THIS card is definitely in one of my top five favorite cards of all time.

Now that I'm done raving about the pens and the stamps, this card is for the My Favorite Things sketch challenge 249.

Thanks so much for stopping in and God bless!

SUPPLIES

Cardstock: Michaels, Canson
Patterned paper: Crate Paper Pretty Party
Stamps: My Favorite Things Harvest Mice and Perk Up
Ink: Versafine
Other: Zig Clean Color Real Brush pens, Glossy Accents, vellum, glitter tape (American Crafts)

Tools: Cuttlebug, My Favorite Things Harvest Mice and Boutique Window dies, Lawn Fawn Stitched Border dies

9.28.2015

Simple Patterned Paper Layering // Hero Arts

Today I'm sharing a simple card that looks pretty busy, and lets the patterned paper take the spotlight.


I used the popular Happy Stamp and Die cut set, and backed it with some gorgeous patterned paper from Crate Paper.
To help the paper shine, but make sure the die cut could stand out, I used two pieces of vellum to layer behind the die cut and heat embossed sentiment. If you have a thicker vellum, you could just use one layer, but this vellum was rather thin, so I used two layers to make sure it "clouded" out part of the patterned paper enough.


I liked the not perfectly embossed "anniversary" when I made this card (i.e., I was too lazy to do it over), but now I'm starting to rethink that...

Thanks for stopping in today and God bless!

SUPPLIES

Cardstock: Canson
Patterned paper: Crate Paper Maggie Holmes Open Book
Stamp: Hero Arts Happy Stamp and Die cut set
Ink: Versamark
Other: vellum (Darice), embossing powder (Hampton)

Tools: heat gun, Cuttlebug, Hero Arts Happy Stamp and Die Cut die, sewing machine 

9.24.2015

Scrappy Card // Throwback Thursday

Today's card was published in an old issue of Paper Crafts and Scrapbooking magazine.

************************************************************

All the patterned paper on this card came from the scrap envelope, and none of them were trimmed at all to fit the card...though I guess you could tell from the overall messiness, couldn't you? ;)
Whatevs. I was in a messy mood, so this was nice to get out of my system.


This was so fun to make, and I felt very pleased with myself that I was able to use up the scraps.

Thanks for popping in today!

**************************************
Cardstock: Canson, Hobby Lobby
Patterned paper, die cut and sticker: Crate Paper "Storyteller"
Stamps: Papertrey Ink "Mini Blooms"
Ink: Stazon
Other: pearls (Queen and Co), string (stash), doily (Martha Stewart), sequins (Michaels), nail polish

Tools: heart punch, Cuttlebug, My Favorite Things "Framed Greetings" die

8.22.2015

Die Within a Die // Altenew

Hello there, today I'm popping in with a card for the August Altenew challenge, Simon Says Stamp Monday Citrus challenge, and a little way to stretch your dies (I think that phrase is funny, since dies are metal and very...unstretchy)

I was mainly inspired by the dark woodgrain wall and the pops of yellow from the inspiration photo, and yes, you guessed it, I used Vintage Roses.
That set is definitely high in my ranks of the Stamp Greats.


Stamping the flowers was funny and easy, as was arranging them (read: I just piled them all together and stuck leaves in randomly). I knew I wanted to use this patterned paper from a Maggie Holmes paper pad, but I didn't know how I was gonna frame the flowers, as I didn't want to take away from the bold brown.
I eventually decided on pulling out an oldie but a goodie die set, Nestabilities Labels 4, and so that I only got a small pop of white, I die cut a window, using the two largest frames.
This technique isn't limited to die sets or dies of the same shape - you could even cut a circle, and then a heart or flower inside it!


I heat embossed the sentiment inside my frame, topped the roses off, and I was done! I will add a bit of forewarning on the sentiment though - I used the EK Success powder tool to make sure the embossing powder would only stick where I stamped the sentiment. It filled its duty admirably, but it left some traces of its own powder behind. I've found this is the case with other dark papers - the powder tool won't completely brush off and will leave some light residue.
So I would say to use the tool very lightly on dark cardstock, or go with some good old fashioned cornstarch, which works the same way.

Thanks for stopping in and God bless!

SUPPLIES

Cardstock: Michaels, Papertrey Ink
Stamps: Altenew "Vintage Roses"
Ink: Tim Holtz, Studio Calico
Patterned paper: Crate Paper - Maggie Holmes "Open Book"
Other: pearls (Darice), embossing powder (Hero Arts)

Tools: heat gun, Nestabilities Labels 4 dies, Cuttlebug

8.20.2015

Over the Edge // Throwback Thursday

While not turning out exactly how I envisioned, I still like the happiness of this card.


Looking back on this card, I think I would've stamped the airplane's flight pattern in a dark grey, so it didn't clash with the sentiment as much.
Still, those are nice clouds, floating off the card as they so carelessly do.
Good job, 2012 Clare.
*pats self on back*

SUPPLIES

Cardstock: Strathamore, Core-dinations
Patterned paper: Crate Paper "Storyteller"
Stamps: Papertrey Ink "Happy Trails"
Ink: Stazon
Other: sequins (Michaels)

Tools: Fiskars cloud punches

7.26.2015

Coloring Patterned Paper // My Favorite Stamps

Hi there! Today's card is for the My Favorite Things sketch 238 challenge, the Simon Says Stamp Monday "i" (I used ikat) challenge, and the Simon Says Stamp Wednesday Sparkle and Shine challenge.

Let me just start this off by saying how flipping cute Birdie Brown's Birthday Bears stamp set is. Not only is it possibly my favorite animal stamp set ever, but my younger sister Rosie, who, if you recall, is one of my biggest critics (but also supportive - she's strange that way ;)) saw it and declared it her favorite stamp set I've ever gotten.
How's that for praise? ;)


I used the cute Best Friends stamp set to transform the birthday themed bear set into a baby boy card.
The balloon has Glossy Accents on it, but it's difficult to tell in these photos...


Coloring patterned papers is actually really fun - you just need to use lighter colored papers, with more subtle or less distracting patterns. I colored the bow of my present, then heat embossed it with clear embossing powder for a "satiny" finish to the bow.
The grid background behind the bear, the present and the balloon are all patterned papers that you could easily add color to. If the patterned paper is already colored, it's best to stick with colors that are in the pattern, or the color might look a little funky. For the present, I just used a darker shade of orange.


That's it for me today! Thanks for stopping in and have a blessed Sunday!

***************************************************
Cardstock: Canson, Papetrey Ink
Patterned paper: Crate Paper "Journey" and "Pretty Party"
Stamps: My Favorite Things "Birthday Bears" and "Best Friends"
Ink: Versafine, Versamark, Tim Holtz
Other: clear embossing powder, Glossy Accents

Tools: heat gun, Cuttlebug, My Favorite Things "Birthday Bears" stamp set

7.25.2015

Papertrey Ink July Blog Hop Challenge

Hello all! Today I'm sharing a card for the Papertrey Ink Blog Hop challenge (my blog post title didn't give it away, did it? ;))

What I took from the photo is pretty obvious - butterflies (of course), pink, and then I thought the sentiment kinda looked like the pictures on the wall.
My butterflies were cut using the Happy Trails die, and topped with a gold embossed sentiment from Sweet Speech.


The bow was a little tricky to tie - the thinner the thread/string, the harder it is for me to get a tight bow. After several pathetic attempts, I solved my dilemma by adding a little ball of temporary adhesive down to the patterned paper. As I twisted the thread around each other, I used the adhesive to keep the little cross in place, then once I had finished off my loops and completed the bow, I was able to remove the adhesive.


Gold is always so tricky for me to photograph, and this is probably the only card I was able to do gold semi-justice.
Oh, and isn't that stitched border so fun? I know I'm gonna be getting a lot of mileage out of THESE stamps.


Here's a video to show you how I made the card.


If you're looking for some stamps to fill up your stash, I'm having a stamp sale HERE.
That's it for me today! Enjoy the rest of the hop and your weekend!

***********************************
Cardstock: Papertrey Ink, Bazzill
Patterned paper: Crate Paper "Journey"
Stamp: Papertrey Ink "Sweet Speech"
Ink: Versamark
Other: gold string, pearls, gold embossing powder

Tools: Cuttlebug, Lawn Fawn Stitched Borders die, Papertrey Ink Happy Trails die

7.22.2015

Escape to Stamping // Blog Redesign

I'm back today with a new blog redesign, and the winner of the Simon Says Stamp certificate from the My Purple Battle redesign!

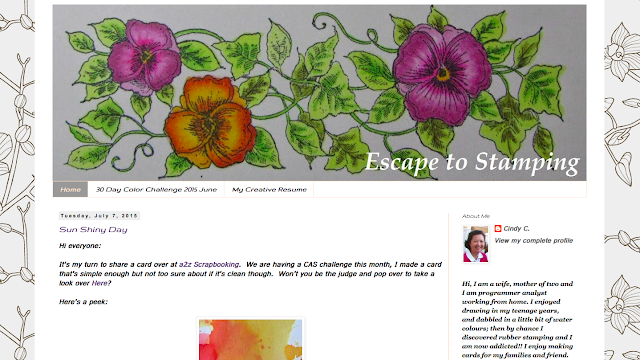
For my second redesign, I got to work with a long-time blogger friend and fellow card maker, Cindy from Escape to Stamping.

Her blog before the redesign...


...and after! Check out Cindy's blog for the full look, and to check out her lovely cards. :)


And again, a brief of the design process...

Cindy was so fun to work with - it really makes the design process so fun and challenging when the "customer" contributes ideas. With Cindy's vision, and my newbie skills, we were able to make a blog that we are both happy with!

I couldn't shake that pretty green color out of my mind, so here's a sort of coordinating card to, well, celebrate. ;)


Thank you so much for letting me redesign your blog, and for helping me hone my design skills, Cindy! :) Make sure to hop on over to Cindy's new blog!

Before I forget, the winner of the gift card from the first redesign post is...Alice K.! Yay! Alice, please e-mail me so we can work on getting the gift certificate over to ya. ;)

Thanks for stopping in and God bless!

********************************
Cardstock: Canson
Patterned paper: Crate Paper
Stamps: Papertrey Ink
Ink: Studio Calico, Versamark
Other: embossing powder, gem

Tools: Papertrey Ink dies, Cuttlebug, heat gun, Memory Box dies