Showing posts with label Papertrey Ink. Show all posts

4.25.2016

Retro Happy Birthday // Papertrey Ink

It's been awhile since I've had a free moment to play along in a contest or blog hop, so I'm so happy to share this card I made for this month's Papertrey Ink blog hop.


I've wanted to play with the Retro Style stamps for awhile now, so I finally caved a couple months ago and bought them. I have to admit, they're a little overwhelming at first because there's so many layers to the stamp set and SO many different ways to make a card with them, but they're gonna come in handy making masculine cards.


I have to say, the arrow and the sentiment are my favorite parts of this card. I really like the look of detailed sentiments like this, die cut and popped up on foam. The little gems I found on eBay, when I was looking for a cheap clear droplet substitute (I ended up caving on the droplets too, and buying them later haha)

Here's the inspiration photo for the April Papertrey Ink blog hop - I was a little worried at first, as I've never really used this color scheme before, but the challenge proved to be very fun!


Thanks so much for stopping in and God bless!

SUPPLIES


Cardstock: Canson, stash
Patterned paper: Crate Paper Bloom, Bazzill Wayfarer
Stamps: Papertrey Ink Retro Style Birthday Sentiments
Ink: Versamark, Tim Holtz
Other: gems (eBay)

Tools: Cuttlebug, Papertrey Ink Retro Style dies, Mama Elephant star dies, circle dies

1.12.2016

Simple Fall Scene // My Favorite Things

Today I'm popping in with a card I had an absolute blast making, even if it isn't exactly seasonal. ;)

I actually made this card a couple months ago, but I forgot to share it on my blog (I posted a quick pic of it on my Instagram for Kathy Rac's coloring challenge in November)


These little Harvest Mice are ridiculously cute and fun to color. I was afraid I wouldn't really use them, cute as they are, because of my coloring handicap, but I couldn't resist after seeing all the adorable cards Melania made using them (seriously, that girl is amazing). Lucky for me, my Zig Clean Color pens came in right when the stamps did - a match made in stampy heaven.


I embossed the kraft cardstock for some more texture, and topped off the card with the gems, but it was pretty simple, and ridiculously fun to make. I can't wait to give this one out - I'm not sure I'll wait until next fall. ;)

Thanks so much for stopping in today and God bless!

SUPPLIES


Cardstock: Canson, Hero Arts kraft
Stamps: My Favorite Things Harvest Mouse
Ink: Versafine, Versamark
Other: gems (Hero Arts)

Tools: Cuttlebug, My Favorite Things Harvest Mouse dies, Papertrey Ink Woodgrain impression plate, Zig Clean Color brush pens

12.26.2015

Custom Die Cut Window + VIDEO // Papertrey Ink

I hope you all had a beautiful Christmas! Remember the 12 Days of Christmas, so the celebration doesn't stop with yesterday's festivities. ;)

I have two cards to share today, and a video later (I woke up with a super scratchy throat, so once that clears up, I'll narrate the video and add it to the post) for the December Papertrey Ink Blog Hop, the Simon Says Stamp Monday Winter Wonderland challenge, and the Simon Says Stamp Wednesday Make It Sparkle challenge.


For the window, I took a small rectangle die and cut out four panels - super quick and easy window panel! It's hard to tell in the photo, but I added a scored "shutter" on either side of the window to help balance out the narrow window frame.


I really love this Winter Woods stamp set. Like, really love it.


I added some Martha Stewart "snow"/glitter to the cards, making them fun shaker cards. I know I've said several times that I'm not into the whole shaker card craze, but looking back on some of my recent posts, I've realized it's time to come clean and join that club. ;)


Here's the blog hop inspiration photo...


Real quick, I'm having a giveaway HERE due to end tomorrow, and my friend Mariana is also having a little giveaway on her blog as well.

Thanks so much for stopping in and enjoy your weekend!!

SUPPLIES


Cardstock: Canson
Stamps: Papertrey Ink Winter Woods and Rustic Wreath
Ink: Studio Calico (red and green), Versamark, Hero Arts (black and white)
Other: glitter (Martha Stewart), white embossing power (Hero Arts)

Tools: Cuttlebug, Avery Elle Stitched Rectangles die, scoring board, heat gun

11.25.2015

Scene Masking + VIDEO // Papertrey Ink

I knew I had to play along with this month's Papertrey Ink blog hop once I got my new stamps in - the Winter Woods stamp set is quickly making itself one of my all time favorite stamp sets.
Here's the inspiration pic...


Since I am sorely lacking the birthday cards department, I thought I'd make birthday cards for the hop - plus, that sentiment really is so pretty.


I didn't have any music note stamps, so I drew them in myself with a Micro pen.


This second card is full on Peacock Feathers ink - I love how easily this card is to change up.


And a video for you! I actually filmed it just this morning, probably the shortest one on record - about half hour! I rarely make cards that fast, much less while filming!


If you are having problems viewing this video, please try watching it HERE on YouTube.

Thanks so much for stopping in and have a beautiful day! God bless!

SUPPLIES

Cardstock: Canson, Bazzill
Stamps: Papertrey Ink Winter Woods
Ink: Hero Arts (black, mint julep), Tim Holtz (peacock feathers)
Patterned paper: Dear Lizzy

Tools: masking tape, circle die, Cuttlebug

11.16.2015

Blog Named Hero Blog Hop // Hero Arts

Today the Hero Arts blog is hopping with A Blog Named Hero!


I had so much fun making this little scene - I can't seem to stop using this wreath stamp! One of the things I love about this multi-step stamp set is that you don't have to stamp every layer. I've already made several cards with this wreath stamp set, and I don't think I've used the second or third layer yet!


I added some glitter to the wreath - this was one of the last things I did to the card, and I was going for more of a snowy glitter look, but I didn't want to have too many textures going on in the card, so I left it at this more translucent glitter.


Again, I used my ombre ink for the wreath, and it adds such a nice little touch. When I use the Hero Arts ombre ink, I have a special way of doing it.
Basically, when I use the ombre ink pads, not only do I do the little stamp "dance" recommended on the Hero Arts website (which is moving your stamp up and down the pad to get a more even ombre look), but I really ink up my stamp.
I press my stamp pretty firmly against the ink pad until I'm sure it's completely covered with ink, then I lightly tap it against the ink pad to even out the ink and prevent the ink from pooling on any particular spot on the stamp. It is especially important to do this if you're stamping on vellum, because the more ink you have on your stamp, the easier it is to slide and smear on the vellum. 


I don't have the brick stencil background, so to create my brick background, I first embossed my brick die into the red cardstock, then I used the die to cut into a piece of thin transparency. I used this transparency as a cheap stencil, and added some more red coloring to the bricks using some Distress Inks. This is a great way to stretch your dies - use them as stencils!

Giveaway - Hero Arts stashed away THREE of the November 2015 My Monthly Hero kits to giveaway to readers of this hop. The winners will be randomly chosen from all of the blog hop comments, across all blogs, received by 11:59pm PST on Sunday, November 22nd. Check the Hero Arts blog for the announcement of the winner on Tuesday, November 24th.

That's it for me! I'm the last stop on the hop, but if you missed any of the other blogs, here is the full hop list!

SUPPLIES


Cardstock: Hero Arts Blush Mix cards, Papertrey Ink kraft, Bazzil black, Michaels white
Stamps: Hero Arts Color Layering Wreath and Build a Wreath by Lia
Ink: Hero Arts Black, Light to Red Royal ombre, Lime to Forever Green ombre, Versamark, Distress Ink
Other: Hero Arts white embossing powder, Martha Stewart glitter, black gem (Darice), ribbon (stash)

Tools: Cuttlebug, Hero Arts Color Layering Wreath Frame Cuts, Papertrey Ink woodgrain impressions plate, My Favorite Things brick cover plate

10.08.2015

Keepin' It Real // Throwback Thursday

So today's card is just me keeping it real - I doubt there's a cardmaker alive who doesn't make hideous boo-boos like this one.
Or, at least, I hope I'm not the only one. lol

**********************************
This card is blah for me. :/
On the upside, some friends that were staying over liked it, warped and freckled as it was, so I didn't trash it out of frustration.
I will, however, be sending this out to someone who can appreciate it more ASAP.


Do notice, however, the lovely colored embossing - I splurged and got a nice set of wee bottles of colored embossing powder, and I can't seem to stop using them.

***************************
Cardstock: Canson
Stamps: My Favorite Things Chalkboard Greetings, Papertrey Ink Mini Blooms
Ink: Versamark
Other: embossing powder (Hampton Art), pearls and vellum (Michaels)

Tool: heat gun

9.25.2015

Simple Shaker Cards + VIDEO // Papertrey Ink

It's a doozy today - two cards and a video, playing along with the September Papertrey Ink blog hop! I wanted to show you how I make my shaker cards - no fancy tools, since I don't make shaker cards often enough to warrant purchasing such tools.


For the pocket of the shaker card, I just use a clear packaging envelope and either washi tape or foam tape to seal it up, depending on how thick I want the card to be. I think the pocket would be easier to construct if you did have those fancy tools, but like I said, I simply don't make them often enough to warrant buying said fancy tools.
Anyways, I used Versamarker to color in the leaves of the wreath, for a little extra detail.


So here's take two, with a little more color...


For this card, since I wasn't using the white card base to border the kraft, I wanted to bring in the white somewhere beside just the sentiment. I pulled out my old but trusty white Sakura pen to accomplish the job.


Here's a video showing you how I made the shaker card...


I don't usually make shaker cards, but felt totally inspired after seeing THIS card by Melania Deasy. Man, that girl makes amazing cards - I feel the sudden urge to buy each and every product she uses on a card once I see it.

Thanks so much for stopping in and God bless!

SUPPLIES:

Cardstock: Canson, Papertrey Ink, Bazzill
Stamps: Papetrey Ink Rustic Wreath, Hero Arts Holiday Greetings
Ink: Versamark
Other: sequins (metallic - Darice, other - Avery Elle), embossing powder (Hero Arts), Sakura white gel pen, clear acetate

Tools: heat gun, Cuttlebug, Papertrey Ink Woodgrain impression plate

9.24.2015

Scrappy Card // Throwback Thursday

Today's card was published in an old issue of Paper Crafts and Scrapbooking magazine.

************************************************************

All the patterned paper on this card came from the scrap envelope, and none of them were trimmed at all to fit the card...though I guess you could tell from the overall messiness, couldn't you? ;)
Whatevs. I was in a messy mood, so this was nice to get out of my system.


This was so fun to make, and I felt very pleased with myself that I was able to use up the scraps.

Thanks for popping in today!

**************************************
Cardstock: Canson, Hobby Lobby
Patterned paper, die cut and sticker: Crate Paper "Storyteller"
Stamps: Papertrey Ink "Mini Blooms"
Ink: Stazon
Other: pearls (Queen and Co), string (stash), doily (Martha Stewart), sequins (Michaels), nail polish

Tools: heart punch, Cuttlebug, My Favorite Things "Framed Greetings" die

9.17.2015

Watercolored Embossing // Throwback Thursday

I was just testing out a technique on some watercolor cardstock, and instead of scrapping it, I decided to use  it on a card.


Thanks for stopping in today and God bless!

*******************************
Cardstock: Canson
Stamps: Papertrey Ink "Happy Trails" and "Year of Flowers"
Ink: Stazon, Versamark
Other: gems (Michaels), vellum (Hobby Lobby), embossing powder (Hampton Art), patterned paper (stash)

Tools: Cuttlebug, My Favorite Things "Butterflies" die, Martha Stewart butterfly punch, heat gun

9.10.2015

Enjoy Your Day // Throwback Thursday

This card was inspired by a shirt my friend was wearing near the end of last spring semester - I would show you the pic I took, but my old phone is terrible at taking pictures and it didn't turn out very clear.


Thanks so much for stopping in today and God bless! 

******************************************
Cardstock: Stathamorre
Stamps: Papertrey Ink "The Sweet Life" and "Mini Blooms"
Ink: Papertrey Ink
Other: gems (Michaels), vellum (Hobby Lobby)

Tools: Cuttlebug, Papertrey Ink "The Sweet Life" dies

8.25.2015

Coloring Twine // Papertrey August Blog Hop Challenge

Hello! I'm here with a card for the August Papertrey Ink blog hop, with a card that involves a little "dyeing".
Here's the pretty inspiration photo...


This photo reminded me of my sister who used to knit and dye yarn - she was an AMAZING knitter!
In the spirit of dyeing, I "dyed" some twine for my card today.


Here's a how-to video.


I wound some twine around a cream yardstick panel, then, with the front of the cardstock protected by some paper, I used some inks, water and a brush to color the string. Once the twine dried (it was pretty fast), I topped the tie-dye effect with some pearls, and some die cut birds from the Tick Tock stamp set.


I stamped the sentiment vertically before embossing the card base with the Woodgrain impression plate - it's very hard to get a clean stamped impression on embossed cardstock if you don't stamp it first.

Thanks so much for stopping in today and God bless!

SUPPLIES

Cardstock: Papertrey Ink, local craft store
Stamps: Papertrey Ink "Tweet Talk"
Ink: Versafine, Tim Holtz
Other: twine, pearls (Darice)

Tools: Cuttlebug, Papertrey Ink Woodgrain impression place and Tick Tock dies, water, paintbrush


8.20.2015

Over the Edge // Throwback Thursday

While not turning out exactly how I envisioned, I still like the happiness of this card.


Looking back on this card, I think I would've stamped the airplane's flight pattern in a dark grey, so it didn't clash with the sentiment as much.
Still, those are nice clouds, floating off the card as they so carelessly do.
Good job, 2012 Clare.
*pats self on back*

SUPPLIES

Cardstock: Strathamore, Core-dinations
Patterned paper: Crate Paper "Storyteller"
Stamps: Papertrey Ink "Happy Trails"
Ink: Stazon
Other: sequins (Michaels)

Tools: Fiskars cloud punches

8.18.2015

Stamped Background Focus // Avery Elle

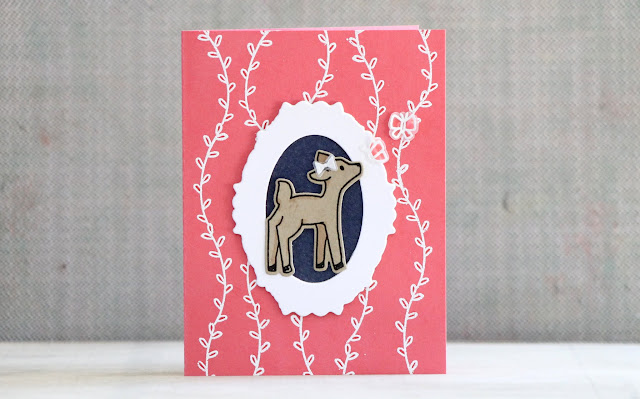
Hello, I'm here today with a card background made using two small image stamps.
This card is for the AEI{heart}U Embossing challenge, with the entire embossed background created using the two small branch images from the adorable Storybook stamp set.
Seriously, can't stop using it.


I topped off the little fawn with an embossed bow, and added some embossed butterflies to give the fawn something to look at. Once I had heat embossed the butterflies, I flipped them over and colored their wings using a Distress Ink marker. After coloring, I zapped the butterflies once more with the heat gun, so that the marker coloring didn't smear.


I did some simple coloring on the fawn with a Memento Marker in Desert Sand. This is the best it gets from someone coloring impaired (i.e. me). ;)


I doubled up the white part of the frame, just to give a little dimension to the project. 


And guess what? I made a video!


That's it for me today! Thanks so much for stopping in and God bless!

SUPPLIES

Cardstock: Bazzill
Stamps: Avery Elle "Storybook", Lawn Fawn "Beep Boop Birthday"
Ink: Versamark, Versafine, Distress Ink, Memento
Other: embossing powder (Hero Arts)

Tools: Cuttlebug, Papertrey Ink Simply Jane die, Avery Elle Storybook die, Lawn Fawn Beep Boop Birthday die, heat gun

8.06.2015

Fabric Window // Throwback Thursday

This card was published in Paper Crafts and Scrapbooking about two or three years ago.

FABRIC WINDOW

A card I quickly put together last night using a negative die cut from a previous card, and some fun fabric a friend sent me.


Some glitter tape adds some extra spice (or should I say sparkle?) to the project.

Thanks for stopping in and God bless!


8.02.2015

Stamp Smooching // Papertrey Ink

So quick disclaimer - I had a crazy week studying for my calc final (which went really well!), so this card and it's photos were made/taken a lot quicker than my typical snail pace, so the photos at the very least aren't up to par today. However, I do need to get this in before the challenge deadline, so you will be subjected to the subpar today, but don't worry, I won't make this a regular thing. ;)

This card was made for this weeks Papertrey Ink Make It Monday challenge and Simon Says Stamp Wednesday Anything Challenge.


In her instructions on texture kissing, Lizzie Jones recommended not using juicy inks - well, I was fresh out of non-juicy inks in the colors I wanted to use, so I had to use my juicy Studio Calico Color Theory inks.
The result was a maybe not so crisp first impression of the technique, but the Color Theory inks work really well for generation stamping, and so I was able to get a second impression of the texture kissing.


I'll be sending this on over to my brother and his family, who just moved to Utah (blah). It's kind of belated, but I still think it's fun to receive handmade cards in the mail, late or otherwise.


I didn't have any orange cardstock that matched the little chick color, so I used the ink itself to color a short strip of cardstock, then added a LOT of powder so that when I stamped my sentiment in Versamark, the embossing powder would only stick to the sticky stamped sentiment.

I'm off to beat my siblings in a game of euchre - enjoy the rest of your Sunday!

***********************************
Cardstock: Pat'Catans
Stamps: Papertrey Ink "Wet Paint", "Postmarks" and "On the Farm"
Ink: Studio Calico, Versamark
Other: embossing powder (Hero Arts)

Tools: heat gu

7.30.2015

Die Cut Watercolor // Throwback Thursday

Let's finish out July's Throwback Thursday feature go out with a nice bright pop of color! Some of these Throwback Thursday cards are rather painful for me to share, but I still like this card, two years later. ;)

**************************************
While this is not an outstanding example of orginiality, I still love it - it's even cooler in real life, when you can see the dimension from the negative die cut butterflies.


Thanks for stopping in and God bless! 

**********************************
Cardstock: Strathamore
Stamp: Papertrey Ink "Happy Trails"
Ink: Stazon, Papertrey Ink, Tim Holtz
Other: sequins (Michaels)

Tools: Cuttlebug, My Favorite Things "Butterflies" dies

7.25.2015

Papertrey Ink July Blog Hop Challenge

Hello all! Today I'm sharing a card for the Papertrey Ink Blog Hop challenge (my blog post title didn't give it away, did it? ;))

What I took from the photo is pretty obvious - butterflies (of course), pink, and then I thought the sentiment kinda looked like the pictures on the wall.
My butterflies were cut using the Happy Trails die, and topped with a gold embossed sentiment from Sweet Speech.


The bow was a little tricky to tie - the thinner the thread/string, the harder it is for me to get a tight bow. After several pathetic attempts, I solved my dilemma by adding a little ball of temporary adhesive down to the patterned paper. As I twisted the thread around each other, I used the adhesive to keep the little cross in place, then once I had finished off my loops and completed the bow, I was able to remove the adhesive.


Gold is always so tricky for me to photograph, and this is probably the only card I was able to do gold semi-justice.
Oh, and isn't that stitched border so fun? I know I'm gonna be getting a lot of mileage out of THESE stamps.


Here's a video to show you how I made the card.


If you're looking for some stamps to fill up your stash, I'm having a stamp sale HERE.
That's it for me today! Enjoy the rest of the hop and your weekend!

***********************************
Cardstock: Papertrey Ink, Bazzill
Patterned paper: Crate Paper "Journey"
Stamp: Papertrey Ink "Sweet Speech"
Ink: Versamark
Other: gold string, pearls, gold embossing powder

Tools: Cuttlebug, Lawn Fawn Stitched Borders die, Papertrey Ink Happy Trails die

7.22.2015

Escape to Stamping // Blog Redesign

I'm back today with a new blog redesign, and the winner of the Simon Says Stamp certificate from the My Purple Battle redesign!

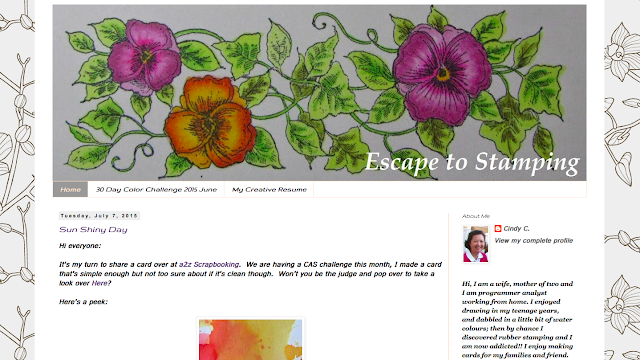
For my second redesign, I got to work with a long-time blogger friend and fellow card maker, Cindy from Escape to Stamping.

Her blog before the redesign...


...and after! Check out Cindy's blog for the full look, and to check out her lovely cards. :)


And again, a brief of the design process...

Cindy was so fun to work with - it really makes the design process so fun and challenging when the "customer" contributes ideas. With Cindy's vision, and my newbie skills, we were able to make a blog that we are both happy with!

I couldn't shake that pretty green color out of my mind, so here's a sort of coordinating card to, well, celebrate. ;)


Thank you so much for letting me redesign your blog, and for helping me hone my design skills, Cindy! :) Make sure to hop on over to Cindy's new blog!

Before I forget, the winner of the gift card from the first redesign post is...Alice K.! Yay! Alice, please e-mail me so we can work on getting the gift certificate over to ya. ;)

Thanks for stopping in and God bless!

********************************
Cardstock: Canson
Patterned paper: Crate Paper
Stamps: Papertrey Ink
Ink: Studio Calico, Versamark
Other: embossing powder, gem

Tools: Papertrey Ink dies, Cuttlebug, heat gun, Memory Box dies