Showing posts with label Girls Paperie. Show all posts

12.28.2012

On the fourth day...

....I went cuckoo for the Hero Arts 'Cuckoo' stamp set. :)


However, the "I'm cuckoo for you!" sentiment didn't fit nicely on a small tag, so I went with 'hello'
My first time stamping on felt...
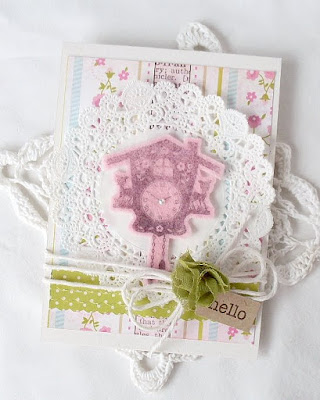

Love that little flower. You know the Websters Pages bloomers? Well, sometimes I only use one rosette, and then there's the little pieces in between. So I saved those little pieces, and made another mini rosette with one. :)
And then, to finish it up, some deeeelicious Girls Paperie...I only was able to get my hands on four sheets, and now there are only bits and pieces left. :( I seriously need to get some more. Wish they came in a 6x6 pad Crate Paper style.

If you'd like to win a large flat rate box stocked full of papercrafting goodies, you can participate in the my twelve days of Christmas challenge by checking out THIS post, or linking up your card on the sidebar!

Thanks for popping in today!

*******************************
Card recipe
Cardstock: LSS, Bazzil
Patterned paper: Girls Paperie
Stamps: Hero Arts "Cuckoo" and "Just saying hi"
Ink: Staz-on, Tim Holtz Distress Ink "Walnut Stain" and "Worn Lipstick"
Trim: Websters Pages
Pearl: Kaisercraft
Other: doily HERE, twine HERE

Tools: trimmer, scissors, adhesive

11.18.2011

Be happy

...I know I am. :)

I used a LOT of old paper and scraps on this shabby card - OA, Girls Paperie, DCWV, Cosmo Cricket, and another company I'm not sure of. It was some double sided Christmas paper, with this beautiful kraft on one side.


Ahhhh, it feels so good to be posting these old photos. :)

Thanks so much for stopping in and have a blessed day!

******************************
Cardstock: LSS
Patterned paper: October Afternoon "Fly a Kite", The Girls Paperie, Cosmo Cricket "Honey Pie", DCWV
Stamp: MFS
Ink: Tea Dye
Pearls: Prima, Recollection

Tools: trimmer, adhesive, scissors, Cuttlebug, die

5.11.2011

Thinking of you

Long time, no blogging! ;)

I enjoyed my break, and made some nice little pretties in the process - I'll show you them sometime, once I get caught up in the 73 drafts I have gathering dust in Blogger right now. It's ridonkuluos how much I have to share with you!

This post was quite an old draft - all the way from August, when CARDS asked me to be their featured designer for April '11 (a BIG thanks to CARDS!)
I was expecting lots of new CHA products and stamps to come in so I could make cards with new product for the issue, but wouldn't you know it, nothing arrived until the day after I submitted my cards. :P haha


I had to stamp onto the reverse of some patterned paper I had because I was all out of quality white cardstock - this substitute works really well, unless you need white cardstock for a base...than, not often.

Anyways, I have a lot to catch up on - hope to stop by all my friends blogs as soon as I can find the time.

Thank you for popping in! :)

*******************************
Card recipe
Cardstock: Bazzil
Patterned paper: Girls Paperie, Basic Grey, DCWV
Stamps: Hero Arts "Tree, Birds and Messages", and "Thinking of You messages"
Ink: Colorbox
Ribbon: American Crafts
Other: thread

Tools: trimmer, adhesive, sewing machine, scissors

4.16.2011

Sew nice

Just quickly popping in to share a March CARDS pub...

I was made this when I was on a run where I kinda stuck a bunch of pretty stuff together, and hoped it looked pretty! Ha! Actually....I'm still in that phase. Lol, oh well, moving on...


Instructions: Stick pretty stuff together. 
How 'bout those instructions? Gotta be my shortest ever. ;) But seriously, those are the instructions!

Thanks for all the sweet comments the last few postings - still trying to catch up today! Thank goodness Lent will be over next week! This no blogging thing is driving me nuts! ;)

Thanks so much for stopping in today, and I hope you enjoy your weekend!


******************************************
Card recipe
Cardstock: Bazzil
Patterned paper: Girls Paperie, Basic Grey, Tim Holtz
Stamps: Hero Arts "Sew Artsy"
Ink: Colorbox, Staz-on, Studio G
Ribbon: American Crafts lace, seam binding available HERE
Half pearls: Hero Hues
Button: Joann Fabrics

Tools: trimmer, scissors, adhesive

2.17.2011

Waltzingmouse blog hop


{squeal!}
Yes! I actually have Waltzingmouse stamps, so now I get to participate in the blog hop! Yay!

This months theme is buttons...uh, honestly, I'm not really a button person, but I had to participate in this hop, so I just stuck a button on my card! ;)


Some pretty Girls Paperie paper....my original four sheets are down to bits and pieces..:(


I actually had a third butterfly on the roses, but I suppose it fell off somehow - I hadn't stuck it on securely with Glossy Accents (love that stuff!) like with the other accents


And the button! Found it in a old abandoned button jar - so sweet!


Isn't the tag so cute? It's from my ABC vintage image set in my shoppe. :)

Anyways, I think that's about it - thanks so much for dropping in a have a wonderful day!

************************************
Card recipe
Cardstock: LSS
Patterned paper: Girls Paperie
Stamps: Waltzingmouse "Fancy Phrases" and "Very Vintage Labels 1"
Ink: Tim Holtz Distress Ink "Walnut Stain"
Pearls: Kaisercraft
Flowers: Remembrance
Other: ribbon, doily

Tools: trimmer, scissors, adhesive, Cuttlebug, Spellbinders, sewing machine, stylus, Glossy Accents, MS punch

10.16.2010

I remembered!

IF YOU'RE LOOKING FOR THE SSC BLOG HOP POST, PLEASE SCROLL DOWN ONE POST

Hi there!
Thought I'd forgotten my promise of two posts today, eh? Not a chance. ;)

So, here are TWO cards - four in one week, but crammed into two days. Sorry about that - this week was unusually busy, like I said, but I still managed to get a card made for this weeks 2S4Y sketch, and one for the Wee Memories challenge (which I'm guest designing for - thanks Jenny! :)) Unfortunately, the weather this past week has either been stormy or super bright, which isn't my ideal for taking pictures. So without further ado...

The 2S4Y card;


Instructions: Cut and score card base. Cut patterned papers, distress edges, and tie bow around it. Adhere to base. Stamp image onto doily, color and distress. Stamp butterflies, cut out, adhere to doily and adhere to this to base.

And for the Wee Memories challenge, which I also used the 2S4Y sketch on...


Instructions: Cut and score card base, then distress. Cut patterned papers, distress, and adhere to base. Tie bow around base. Cut purple and cream patterned papers using dies, and stamp sentiment. Adhere felt image to die cuts and adhere to base.

Pretty much it for today - hope you had fun and enjoyed the hop!
See ya next week! ;)

*****************************************
Cards #1 recipe
Cardstock: Unknown
Patterned paper: Girls Paperie
Stamp: Martha Stewart, unknown
Ink: Martha Stewart
Ribbon: Seam binding available HERE
Other: colored pencils, doily


Card #2 recipe
Cardstock: Bazzil
Patterned paper: October Afternoon "Thrift Shop" and "Fly a Kite", DCWV, Crate Paper
Stamp: Hero Arts "Elephants"
Ink: Colorbox
Ribbon: Unknown
Image: Martha Stewart

Simply Scrapping Crafts Haunted Hallow Blog Hop!

Welcome to Simply Scrapping Crafts First Annual Haunted Hallow Hop!  We have quite a line-up for you today filled with lots of tricks and treats!  Now what would trick or treating be without candy?  Eye candy that is!  Our DT has been busy at work in Dr. Jekyll's lab creating just the right formula to inspire your hauntingly sweet projects this year.  Be sure to comment all of the blogs along the way because we have "hidden" some extra special treats along the way.  There is no way to tell where we have them stashed, so be sure not to miss out!  Some of our hop hosts are giving an extra entry for becoming a follower.  Who doesn't appreciate more chances to win right? 

 All winners will be announced on Tuesday, October 19, 2010 via the DT blogs and also in the hop room at SSC, which can easily be accessed here.  You have until 11:59PM EST tonight, October 16, 2010 to comment for your chance to win.  All you need to do is click on each link and leave a comment as you hop along to the end of the list.   


Are you ready for a frightfully wicked Haunted Hallow Hop?  Let's get to hoppin'!
First off, I'd like to let you know I'm not a big Halloween fan - sorry! However, Halloween is in the fall, so I went ahead with a fall theme - hope that works! ;)


Card recipe: Cardstock (LSS, Bazzil), Patterned paper (Making Memories, Girls Paperie, Basic Grey, Crate), Stamps (Hero Arts "Mi Casa"), Ink ("Staz-on, Tim Holtz Distress Ink), Other (twine)
Lots of paper piecing, as you can see.  :) I also had just gotten my first Tim Holtz Distress Ink Pads the day I made this, and I was so excited, I went a little overboard with the distressing on the house (edited for Lisa; the house is from the Hero Arts "Mi Casa" stamp set - gotta love it!)

Now please hop on over to my utra-talented, uber sweet sistah who brought this whole hop together, Pryn!

One last thing - if you are a follower, please leave an extra comment, and you'll be entered twice for the prize! And I will be double-checking. ;)

10.08.2010

Flowery birthday (because I couldn't come up with a better title)

Hi there!

{Sigh} I love Fridays - it means you're close to Saturday, which is my favorite day. :)

This is a recent card - I seriously hadn't made a card for almost two weeks before making this. Right now, cardmaking wise, I'm in this little rut where I think 'I'm not putting anything together unless I'm 100% sure it will work!' I was getting pretty desperate when I finally remembered this weeks 2S4Y sketch - I've been having a hectic week where everything is slipping my mind! So I pulled out my latest cardmaking faves - Girls Paperie paper, hand-dyed seam binding, a pretty sentiment and cream, speckled cardstock, and put this little number together.
Oh, and psst! You might want to take a look at the sketch I used - COTW wins a spot on the team! ;)


Instructions: Cut and score card base; round corners. Stamp images onto cream paper, and add glossy accents. While this is drying, cut patterned papers out and sew together. Cut two small slits in between the papers, and tie a bow through this. Adhere button on bow. Adhere image to patterned papers. Stamp sentiment and adhere to patterned papers. Adhere patterned papers to base.

I suppose you can't see the glossy accents from the photo, but they're there and I absolutely love them! I've been sticking it on everything, even embellishments I wasn't even planning on using! It's just so much fun. :)

And lastly, before THIS slips my mind as well, thanks so much for all the sweet comments yesterday! They are VERY much appreciated!
Have a sweet weekend!

********************************************
Card recipe
Cardstock: LSS
Patterned paper: Girls Paperie, Basic Grey
Stamps: Martha Stewart, Sugarloaf
Ink: Colorbox, Martha Stewart
Ribbon: Hand-dyed available HERE
Other: glossy accents, button, embroidery floss 

Tools: trimmer, scissors, adhesive, sewing machine

9.17.2010

Ribbony wishes

Hello there!

Just quickly popping in this card before I head off to Ohio to  spend the weekend with some friends. :)


Ribbon galore!


Instructions: Cut and score card base, and cut out patterned papers. Adhere striped patterned paper and half doily to base and distress. Make a frame using the pink and white die cuts, and adhere to base. Stamp image onto paper, and cut out using punch. Attach this to center of frame, and adhere gem to center of punch. Adhere half pearls to corners of frame. Tie two double bows, and adhere flowers to center.

Sorry, I couldn't make the photos any smaller on here without them being minuscule. ;)

That's it for the weekend - thanks so much for stopping in! :)


************************************
Card recipe
Cardstock: Unknown
Patterned paper: Girls Paperie, Cosmo Cricket "Honey Pie"
Stamp: Hero Arts "Thinking of You messages"
Ink: Colorbox, Martha Stewart
Jewels: Half pearls by Remembrance, gem by Prima
Ribbon: Offray
Roses: Remembrance

Tools: trimmer, adhesive, Cuttlebug, Nestabilities, scissors, circle punch

9.08.2010

Be happy

Hiya!
Thanks all for the sweet comments in the blog hop a few days ago! I wasn't able to visit everyone's blog, but the ones I did had some FABulous projects! Gotta love those HA gals and their amazing talent. :)

Today, sharing a quick little card I made, after a couple days of NO mojo...dang it, I hate those kind of days. :( But nothing like a big ol' load of HA product to cheer a cardmaker up! ;)


{this is an older picture, so it wasn't taken very well}

Instructions: Trim card base, and cut out patterned paper. Sew along border of patterned paper, and than stamp sentiment and image onto paper. Paper piece the image with blue patterned paper and yellow cardstock. Color in base of image with coloring pencil. Tie twine around sewn patterned paper, and attach button and half pearls. Adhere embellished piece of patterned paper to base using foam squares for dimension. Distress edges of base with ink.

I placed those pearls on the paper, trying to decide whether or not to use them, but when I finally decided not to, I couldn't get them off! So now I'm stuck with it....ah well.

Hope your hump day went well, and thanks so much for stopping in! :)

************************
Card recipe
Cardstock: Bazzil
Patterned paper: Girls Paperie
Stamps: Hero Arts "Be Happy"
Ink: Colorbox
Half pearls: Remembrance (Michaels)
Other: twine, coloring pencil, button

Tools: trimmer, adhesive, foam squares, sewing machine

9.05.2010

Hugs and kissies

Heya!

Welcome to the Hero Arts Flickr Group blog hop! I totally got the date mixed up, and wasn't expecting to post today, but luckily I had a card to share, even though the picture is awful (I seriously took over 75 shots of this card, and this one is the best I could get)
So the theme of the hop was just to focus on your style - I'm not really sure how to explain my style...I'm not shabby chic, or CAS....maybe CAS with a lot of little details....? I don't really know - I just make the cards! ;)


Instructions: Trim card base and cut out patterned paper. Sew patterned paper to base. Stamp images onto patterned paper and cut out, than adhere to doily. Stamp sentiment onto paper, cut out than frame with brown paper. Adhere embellished doily to base. Tie ribbon with button around base, and adhere sentiment on top. Distress edges of card with ink.

I want to thank everyone for the sweet comments yesterday - I am so excited, and can't wait to get my two copies! :)

I really am sending out hugs to any HA girls who might stop in here - you girls are soooo encouraging, sweet and kind! I'm so happy and blessed to be a part of this group!
Thanks for stopping in! :)

***************************************
Card recipe
Cardstock: Bazzil
Patterned paper: Girls Paperie
Stamps: Hero Arts "Elephants" and "Thinking of You Messages"
Ink: Colorbox
Ribbon: Hand-dyed, available HERE
Other: button, doily

Tools: trimmer, adhesive, foam squares, sewing machine

8.15.2010

Tea baggie

Hi there!

Quickie one today - I recently found out about a Waltzingmouse Stamps contest, and had to enter - one of their beautiful stamp sets is up for grabs! Check out the deets HERE.
I chose to go with the sweet tea baggie and had such a fun time making it! I usually don't like templates, but this one was soooo fun. ;)

and the tea, of course...


Instructions: Cut out template onto paper. Embellish.

Ta-da! Easy peasy!

Oh, and some news I wanted to add for stamp/Ippity lovers;
My so-sweet friend Rona is having an awesome Ippity (by Unity) party over at Simply Scrapping Crafts, and she has some awesome prizes and deals for you! Check out the deets HERE.

Thanks for popping in - hope your weekend is turning out well!

**********************************************
Tea Baggie recipe
Cardstock: Unknown
Patterned paper: Girls Paperie, Cosmo Cricket, Hiedi Grace
Stamps: Hero Arts "Tree, Birds and Messages", Sugarloaf
Ink: Colorbox, Martha Stewart
Ribbon: Seam binding, available HERE
Other: button, embroidery thread

Tools: trimmer, adhesive, foam squares, template from Waltzingmouse Stamps, scissors

8.11.2010

Birthday bling

Hiya!

Sorry I've been missing for a little while - I could use the excuse that school is coming up and I'm really busy, but the fact is, I am out of mojo and I don't like doing anything on the computer in a creative rut.
Here is a card I made for the Stamp and Scrap challenge this week - made this when I was in another rut a few weeks ago. Seriously, July and August have got to be my ruttiest months ever. :( But I've had a lot of other awesome things happening, so I guess it's not too good to dwell on this small, negative point. ;)


Instructions: Trim card base and patterned papers. Attach patterned papers to card base, and sew. Adhere ribbon, ruffling as you go along, to card base. Attach frame on top of ribbon using foam squares. Stamp sentiment, punch out, and place in the middle of frame. Distress edges and top off sentiment with gems.

I'm thinking about getting a lightbox, because the photos I've been getting lately have been pretty bad, and they're only going to get worse when winter comes and I can't take my pictures outside. So, anybody have some good, inexpensive solutions? And I'm not sure if I have to buy special lights to go with the box...?

Thanks for dropping in and for all the kind comments!

**************************
Card recipe
Cardstock: Bazzil
Patterned paper: Girls Paperie, Basic Grey
Stamp: Hero Arts
Ink: Colorbox
Gems: Prima
Frame: Colorbok
Ribbon: Seam binding, available HERE
Other: thread

Tools: trimmer, adhesive, foam squares, sewing machine

8.02.2010

Shabby congrats

Hello!

Posting a card I made awhile ago for the 2S4Y challenge, but didn't have enough time to blog about, so I added to Flickr.

But before I start rambling, I just want to thank you all again for all those sweet encouraging comments for my past few cards! They really mean the world!

Now on to the card...
It's been a long time since I've made a card that opens this way, and it will be a long time before I do again! I just don't like taking "flat" pictures of cards, thought this one came out well enough...


Instructions: Trim card base, and cut out patterned paper. Adhere patterned paper to base, then sew near border. Tie bow twice around base. Next, stamp images onto cream cardstock and sew around border. Stamp balloon image onto separate piece of patterned paper, and cut out, attaching to balloon image on cream cardstock. Cut out black polka dot patterned paper, and distress edges. Attach stamped cardstock to this paper, than attach (using foam squares) to card base. Stamp sentiment onto separate piece of patterned paper and attach to base. Distress card with ink.

Mmm, I think I'm addicted to this elephant stamp - he's so adorable! Oh, and one other thing - I got THIS mini guillotine trimmer at Michaels for $6.99 (not including tax ;)) - retail price? $16.99. ;)

Thanks SO much for popping in - have an awesome week! :)

******************************
Card recipe
Cardstock: Bazzil, Darice
Patterned paper: Girls Paperie, October Afternoon "Thrift Shop"
Stamps: Hero Arts "Elephants" and Sugarloaf
Ink: Colorbox
Ribbon: Handyed - available HERE
Other: thread

Tools: sewing machine, adhesive, trimmer, scissors

7.24.2010

Be happy

Hi there!
A card for the EBTKS challenge - a sketch challenge, which is perfect, as I have been in desperate need of sketches with my mojo rather low.
So with the sketch, and a little inspiration from our newest Hero Arts hostesses (congrats again, ladies!), I made this simple card....


Instructions: Trim card base and score. Cut out patterned paper and sew near edge. Adhere to base, and than, using a strip of tape to hold it down, ruffle a long strip of tissue paper down the card base on top of the patterned paper. Next, cut out die, and spray with mist. Stamp image onto die, than stamp image onto white paper. Color and cut out image in white paper, than adhere to die cut using foam squares. Adhere die cut to base, and stamp sentiment near the bottom. Distress lightly with ink pad.

I don't really color images that often, as I like to paper piece more, but I decided to throw caution to the wind for this card (you can tell I'm really bold, right? ;)). Used some plain ol' colored pencils and finished this card lickety split. And the thing that made ME really happy was that the "b" in the sentiment didn't come out blotchy like it did on my last card - yay!
Oh, and one more thing; I was blog hopping, when I discovered THIS set from Hero Arts - another one for the wishlist!

Thanks for stopping in!

**************************
Card recipe
Cardstock: Darice
Patterned paper: Girls Paperie
Stamp: Hero Arts "Be Happy"
Ink: Staz-on
Other: colored pencils, thread, tissue paper, glimmer mist

Tools: trimmer, adhesive, foam squares, Cuttlebug, Nestabilities, sewing machine

7.20.2010

Thinking pretty

Hi there!

Thanks for all the kind, encouraging comments yesterday - you know us bloggers, we depend upon them! ;)

Today, I have another 2 Sketches 4 You card - more sewing! Not quite as crazy though. ;) Finally got some of the highly praised Girls Paperie paper, and on MAJOR discount, thanks to my friend Judy. 


I always liked frame stamps, but my budget doesn't really allow for them, so I made my own...


Instructions: Trim and score card base, and cut out patterned papers. Sew papers to base. Cut out white die using Nestabilties, stamp grid image, and lightly distress with ink. Stamp sentiment onto die. Stamp butterfly image onto reverse of polka dot paper and cut out. Adhere half pearls to centers and than attach to die. Cut out green die, distress, and adhere embellished white die on top. Adhere this to base. Tie bow twice and adhere flower - stick pin through bow. Distress edges of card with ink.

With the card deets out of the way, how do you like the new blog look? I'll have to update the banner, but I just had to use this background template. Plus, I haven't done anything with my blog in a long time, and I was getting bored. ;)

Thanks for popping in - have a great day!

***************************
Card recipe
Cardstock: Bazzil
Patterned paper: Girls Paperie, Michaels
Stamps: Hero Arts "Thinking of You messages" and Grid stamp, Martha Stewart
Ink: Colorbox
Ribbon: Hand-dyed; available HERE
Rose: Remembrance (Michaels)
Half pearls: Remembrance (Michaels)
Other: pin, thread

Tools: trimmer, adhesive, foam squares, sewing machine, Cuttlebug, Nestabilities