10.30.2017

"Personalized" Cards

Today's post is a quick, goofy one.

When I began playing with the Winter Hearth Stamp and Cut set, an October My Monthly kit add-ons, it quickly devolved into a little guy named Calcifer. Now, you may or may not know who this fiery little dude is (ha, I couldn't help myself), but he's a character from Howl's Moving Castle (aka, one of the best animated films of all time), and he's the most adorable little fire demon ever.


Calcifer was stamped in Cup O' Joe for the log, stamped in Orange Ombre, and then I added the mouth with a ZIG pen and the eyes with a Sakura white gel pen and a micron pen. The Sakura white gel pens are so awesome, and something I haven't played with in a long time.

Anywho, he was nestled on the dry embossed coordinating die, on white cardstock, and given a speech bubble (of course!), courtesy of the Holiday Cheer stamp set.

I white heat embossed a strip of Kraft layering paper with the beautiful Holiday Florals background, and adhered that to the card. Pretty simple, but I know whoever receives this card (probably my sister) will love the little guy as much as me.

It's not often that I go out of my way to "personalize" a stamp, but it just occurred naturally with this fire image.

Thanks for stopping in and God bless!

SUPPLIES


Cardstock: Michaels white, Hero Arts Kraft layering paper
Stamps: Hero Arts Winter Hearth Stamp and CutHoliday Cheer and Holiday Florals
Ink: Hero Arts Cup O' JoeOrange Ombre and Black; ZIG; Sakura white gel pen
Other: Hero Arts White embossing powder

Tools: Cuttlebug, heat gun, Hero Arts Winter Hearth Stamp and Cut  and Holiday Cheer die

10.26.2017

Joyful Season

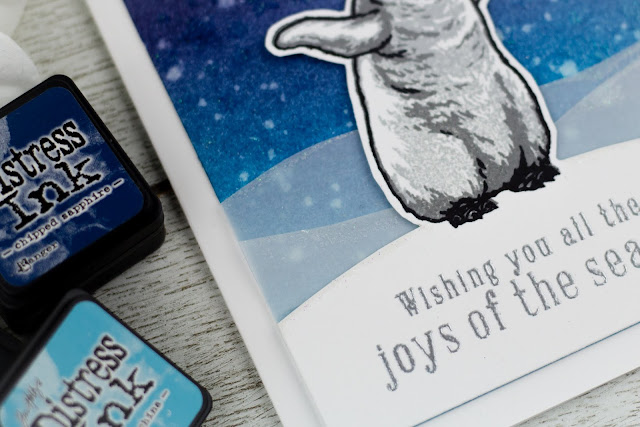
I'm popping in today with another card from the Hero Arts Winter 2017 catalog. The first stamp set I reached for from the catalog was this adorable Color Layering Penguin - he is just too sweet!


I stamped him in Soft Granite, Charcoal, and Black, and then heat embossed a sentiment from Color Layering Holly in Silver below him. I hand trimmed him out, but you could use the coordinating frame cut and partial die cut him to save some time.


I set him on a background I had blended from Chipped Sapphire and Broken China. It's hard to tell in the photo, but I used the Star Confetti die as a stencil and heat embossed some clear Sparkle embossing powder on the background.
I then stuck some freehand cut vellum hills in between, adding a little bit more of that clear Sparkle powder on the tops because you can really never have too much of this stuff. ;)

Thanks for stopping in and God bless!

SUPPLIES


Cardstock: Michaels white
Stamps: Hero Arts Color Layering Penguin and Color Layering Holly
Ink: Hero Arts Soft GraniteCharcoal, and Black; Versamark; Distress Inks Chipped Sapphire and Broken China
Other: Hero Arts Silver and Sparkle embossing powder

Tools: heat gun, Cuttlebug, Hero Arts Star Confetti background die, Tim Holtz blending tool

10.23.2017

Shaped Christmas Cards

I'm over on the Hero Arts blog today with a little card set and a video...


Head on over for more details, and thanks for stopping in!

10.20.2017

Heat Embossing on Felt

Hello! Today I'm participating in a blog with CardMaker Magazine and Terial Arts.

For my project today, I used the Terial Magic fabric stabilizer to stabilize the felt for my mushrooms. I've been wanting to use the adorable You're a Fungi stamp set since it came out, and today's project was the perfect opening!


I sprayed the stabilizer on some Papertrey Ink felt, let it dry for a couple hours (since I accidentally soaked my little bit of felt!), and then ironed it completely dry. After drying, I doused it in anti-static powder, stamped the mushroom in Versamark, and heat embossing with WOW! Metallic Gold Sparkle embossing powder.

Even though it's not the crispest impression, I really love heat embossing on felt. You have to be careful of overheating the powder and the felt - I detail tips in THIS blog post (with a video!).


I adhered the little guy to a card base that I had heat embossed with some dandelion things(?) from the same set. I stamped the sentiment in Black, using the word "sending" from the Yes Stamp and Cut set.
I die cut from hearts from felt using Hero Arts Heart Infinity dies, and then adhered them to the card. Finally, I heat embossed a strip of black cardstock with clear Sparkle power, and added it to the bottom.

BLOG HOP


Follow this blog hop for more inspiration:
Stamps: Hero Arts You're a Fungi and Yes Stamp and Cut
Ink: Versamark, Hero Arts Black
Other: Papertrey Ink felt, WOW! Metallic Gold Sparkle embossing powder and Hero Arts clear Sparkle power

Tools: heat gun, Hero Arts Heart Infinity dies, anti-static powder tool

10.19.2017

More No-Line Coloring with Paper Layering Dies

I'm not gonna lie, I'm not great when it comes to dies. I pretty much stick to the staples - simple shapes, coordinating frame cuts, and the occasional background die. Anything else, and my little crafty brain does not compute.

However, one of the great things about being on the Hero Arts Creative Team are the monthly assignments. Sometimes I get assigned to work with products I really want to play with it, and other times, products that I never would've touched otherwise.

Today's card is an example of that - I was assigned to work with the Paper Layering Bear with Frame die set for THIS post, and I ended up having so much fun with this little guy, that I had to make him again in a different color way.


The bear was cut out of regular cardstock, but if you wanted to do heavier watercoloring or get a more blended look (I was being lazy with this bear - ha!), then watercolor or Bristol paper would work well.
I colored him in with ZIG's Pale Pink, Black and Cobalt Blue. Pretty easy, since he's mostly white anyways, but you could totally go in for shading.


I stamped a sentiment from Santa's Door Accessories in White, then die cut it using the Yes Stamp and Cut die, because he's a bear, and well, you know, bears talk. It's not that I'm obsessed with speech bubbles. Not at all.
;)


The Wallpaper Background was stamped in Indigo, and the bear adhered on using dimensional adhesive. The background was actually from another project I was working on for Hero Arts. This particular one didn't stamp out too well (see the double impression on the left side), so I decided to keep it for a more laid-back card such as this.

Hope you enjoyed my blushing polar bear, and thanks for stopping in!
God bless!

SUPPLIES


Cardstock: Hero Arts Sea Layering Paper, Michaels white cardstock, Joann Fabrics black cardstock
Stamps: Hero Arts Santa's Door Accessories and Wallpaper Background
Ink: Hero Arts Indigo; ZIG Pale PinkBlack and Cobalt Blue, Versamark
Other: Hero Arts White embossing powder

Tools: Cuttlebug, Hero Arts Paper Layering Bear with Frame and Yes Stamp and Cut die, paintbrush

10.16.2017

Christmas Ornament Blessings

Hi all! Today I'm stopping in with a quick little number from the 2017 Hero Arts Winter catalog.
This Holiday Ornaments Stamp and Cut set is super neat, because the stamps can be easily be used for so many different designs and styles!

Today, I paired the ornaments with Hero Arts Purple and Pink Ombre inks.


After stamping the ornaments, I stamped the branch in Soft Olive, and my sentiment, from Blessings Stamp and Cut, in Black.


I adhered the stamped panel to a card base, along with a black strip of cardstock and a strip of cardstock I had colored with the Soft Olive.

If you have a Misti (or not!), this would be a super easy design to replicate to lots of Christmas cards. You don't need any fancy tools to crank this little bugger out. ;)

Thanks for stopping in and God bless!

SUPPLIES


Cardstock: Michaels white, Bazzill Black
Stamps: Hero Arts Holiday Ornaments Stamp and Cut and Blessings Stamp and Cut
Ink: Hero Arts Purple and Pink Ombre, Soft Olive, and Black

10.12.2017

Caroling Elves

Popping in today with a cheery little number, featuring a stamp I designed for Hero Arts that was part of their October MMH add-ons - Three Happy Elves.


I colored the little guys in various ZIG's - . I didn't have a minty color, so to achieve the color, I put down a layer of Cobalt Blue, and then went over it with Pale Green.


I've only recently starting recording my obsession with speech bubbles, and with these little guys, it was inevitable. I think I'm in love with the little bubble from Holiday Cheer - I want like, fifteen more of them in different sentiments! The little guy was stamped in Soft Granite, and the main sentiment, Joy to the World, was stamped in Orchid.
I'm not gonna lie, it was a rather sloppy stamping job there, but you know, I'm really all for that homemade look these days. ;)

The background, Garden Tile Pattern, was inked in Versamark, then Mint Julep, stamped on a mint layering paper, and heat embossed with clear Sparkle powder.

That finishes off today's card - thanks so much for stopping in and God bless!

SUPPLIES


Cardstock: Hero Arts Pool Layering papers, Michaels white cardstock
Stamps: Hero Arts Three Happy ElvesGarden Tile PatternHoliday CheerJoy to the World
Ink: Hero Arts BlackOrchid and Soft Granite; Versamark; ZIG Cobalt Blue and Pale Green.
Other: Hero Arts clear Sparkle powder

Tools: Cuttlebug, heat gun, Hero Arts Holiday Cheer frame cuts

10.06.2017

Plaidtastic Foxes

I used to not be able to understand why people would post Christmas projects all the way back in September or October, but as I've grown older and wiser, I've discovered the key motivating factor behind this: procrastination. 
If it doesn't happen month's before Christmas, it's unlikely to happen close to Christmas, especially with all the business that surrounds it.

With this in mind, I'm going to start posting cards I made for the Hero Arts 2017 Winter Catalog.

We'll kick this off with a bright and colorful Christmas card, featuring the adorable Color Layering Cool Foxes.


The plaid background was made by stamping the Candy Stripes Bold Prints background twice in Indigo, each in opposite directions - an older video of this technique HERE.
The foxes were stamped with Soft Apricot, Orange Soda and Black.


I white heat embossed a sentiment from Holiday Ornaments Stamp and Cut, and die cut it using the Yes Stamp and Cut die. I'm officially documenting my obsession with speech bubbles, starting from THIS post. It's a thing.

I topped the card off with some Pool Mixed Accents gems.

Thanks so much for stopping in and God bless!

SUPPLIES


Cardstock: Hero Arts Sea Layering Paper, Michaels white cardstock, Joann black cardstock
Ink: Hero Arts Soft ApricotOrange SodaIndigo and Black; Versamark
Other: Hero Arts white embossing powder and Pool Mixed Accents gems

Tools: Cuttlebug, heat gun, Hero Arts Yes Stamp and Cut die

10.02.2017

Scenic Village

HI all! Today I'm participating in the Hero Arts October 2017 My Monthly Hero Arts blog hop!

This kit is jam packed full of adorable images and versatile dies, and today's card uses both of those...


To start the card, I made a background by using the Star Confetti die as a stencil, and inking a kraft card base with Unicorn White ink. I stamped the flying santa in the upper corner, and then began building the little village.


The images were all stamped in Black, colored simply with a Carmine Red ZIG pen, and then some Stickles were added for a bit of sparkle. I tucked the buildings in between mountains and trees, die cut from the amazing kit dies.


To finish the card off, I die cut a speech bubble from Yes Stamp and Cut and then heat embossed a sentiment from Color Layering Wreath in White. Adhered the bubble to the base (I'm kind of obsessed with speech bubbles) and that finished the card!

THE KIT


This month's kit includes:
  • 6x8 Clear Set
  • 10 Frame Cuts
  • 3 Fancy Dies
  • 6 sheets 5x7 decorative paper: 3 assorted styles 2 of each
  • 1 Thick Lacquer Pen
  • 1 Silver Embossing Powder 0.5 oz 
  • 1 Unicorn white Ink Cube
The kit value is $70, an amazing deal at $34.99.
The kit is available for a limited time only - once it's gone, it's gone. However, you can now subscribe to receive the kit monthly and never miss one!

BLOG HOP


For inspiration and a chance to win this month's kit, hop along with us!

Clare Prezzia 

GIVEAWAY


Hero Arts is giving away one kit as a prize to one blog reader - selected from the comments across all of the blogs in the hop. (Hero will reimburse the winner if they have already bought the kit).
Giveaway closes Sunday, 10/8 at 11:59pm, and the winner will be announced the following week.

SUPPLIES


Cardstock: Michaels white cardstock, Hero Arts Kraft layering paper

10.01.2017

One Layer Village

I'm over on the Hero Arts blog today, with a one-layer card using the newest My Monthly Kit.


Check out the blog for more details, and thanks for stopping in!