8.27.2015

Stay Cool // Throwback Thursday

I didn't plan this, but you're getting a bunch of masculine/gender neutral cards this month. ;)


Initially, I wasn't sure what I was going to do with the fan patterned paper from Echo park, cute as it was, but then I found a cute dollar bin stamp set, and look how perfectly they work together?
A match made in Michaels. ;)
I used a cloudy vellum on the fan wings (is that what they're called?! I have no idea!) to keep a light, airy look.

Stay cool, my friends, as summer comes to an end.

*sob*

SUPPLIES

Cardstock: LSS, Hobby Lobby
Patterned paper: Echo Park "This and That"
Stamps: Michaels
Ink: Versamark, Tim Holtz
Other: vellum (Hobby Lobby), buttons and string (stash), pearl (Joann Fabrics)

Tools: scallop scissors

8.26.2015

Custom Stamped Background // Avery Elle

Hi all, I'm stopping in today with a card for two challenges, that focuses on making your own custom stamped background.

I started with the Storybook stamp set (I know, I know, I'm obsessed!) from Avery Elle, and instead of using the images as focal points, I used them to create a soft focal background (not sure if that's an oxymoron or not...) piece.


I covered my watercolor panel with some anti-static powder (corn starch is a good substitute) then began stamping all the images from the set. I would stamp one or two images, then cover them with white glitter embossing powder, then resume stamping, repeating the process. Once everything was stamped, I heat embossed everything and went in with some soft watercolor.


I topped the card off with a bold but simple heat embossed sentiment from the Ellie stamp set (which I'm also obsessed with) and a few sequins.


I placed my finished panel on a piece of kraft cardstock that I had already embossed from a previous project.

That finishes up the card, made for the AEI{heart}U Embossing challenge and the Simon Says Stamp Anything Goes challenge.
Thanks so much for the kind words and have a lovely day!

SUPPLIES


Cardstock: Papertrey Ink, Canson
Stamps: Avery Elle "Storybook" and "Ellie"
Ink: Versamark, Tim Holtz
Other: sequins, embossing powder (Hampton Art, Hero Arts)

Tools: Cuttlebug, heat gun, water, paintbrush

8.25.2015

Coloring Twine // Papertrey August Blog Hop Challenge

Hello! I'm here with a card for the August Papertrey Ink blog hop, with a card that involves a little "dyeing".
Here's the pretty inspiration photo...


This photo reminded me of my sister who used to knit and dye yarn - she was an AMAZING knitter!
In the spirit of dyeing, I "dyed" some twine for my card today.


Here's a how-to video.


I wound some twine around a cream yardstick panel, then, with the front of the cardstock protected by some paper, I used some inks, water and a brush to color the string. Once the twine dried (it was pretty fast), I topped the tie-dye effect with some pearls, and some die cut birds from the Tick Tock stamp set.


I stamped the sentiment vertically before embossing the card base with the Woodgrain impression plate - it's very hard to get a clean stamped impression on embossed cardstock if you don't stamp it first.

Thanks so much for stopping in today and God bless!

SUPPLIES

Cardstock: Papertrey Ink, local craft store
Stamps: Papertrey Ink "Tweet Talk"
Ink: Versafine, Tim Holtz
Other: twine, pearls (Darice)

Tools: Cuttlebug, Papertrey Ink Woodgrain impression place and Tick Tock dies, water, paintbrush


So Happy // Hero Arts

Today's the day I can finally tell you - I am a Hero Arts Artist!!!

Libby asked me about this time last year, and I cannot tell you how excited I was! Then, super disappointed - I was spending the fall semester in Austria, and there was no way I could design from there. :(
Lucky for me, Hero Arts is a fantastic company and they invited me to join the next term around.
And here I am, my dream come true, designing for my favorite company ever, along with a few more girls who will be introduced in the next few days (I don't want to spoil the surprise, so no hints right now ;))


I started the card off by stamping the classic Designer Woodgrain in Versamark onto the kraft card base.
For the centerpieces, I stamped the Pattern Hearts and Flowers floral bunch on watercolor cardstock, doing some creative masking to get an extra large bunch.
I inked up the clear stamp with the Versamark first, so that the ink would be extra sticky and I could heat emboss, and then I inked it up with a pink ink. I covered the image with clear embossing powder, heat embossed, and then colored in using some Hero Arts ink and water.
I love using pretty much every ink I have as a watercolor - just press against a clear block or acetate, spritz with water, and oila! Instant watercolor!
Once I cut out the flowers, I felt they looked kinda stark against the background, so I stamped and heat embossed another bunch on some vellum, cut that out, and placed it behind the card. This softens the entire look - I love it!


I hopped off the card with an embossed sentiment and die cut from the Stamp and Cut Happy set, some gems, and Wink of Stella (but of course!) in the center of the flowers.

Thanks so much for stopping in and have an AWESOME day!

SUPPLIES

Cardstock: Papertrey Ink, Bazzill, Canson
Stamps: Hero Arts "Designer Woodgrain", "Stamp and Cut Happy", and "Pattern Hearts and Flowers"
Ink: Hero Arts, Versamark
Other: gems (Darice), embossing powder (Hampton Art, Hero Arts), vellum

Tools: heat gun, Cuttlebug, Hero Arts Stamp and Cut Happy die

8.22.2015

Die Within a Die // Altenew

Hello there, today I'm popping in with a card for the August Altenew challenge, Simon Says Stamp Monday Citrus challenge, and a little way to stretch your dies (I think that phrase is funny, since dies are metal and very...unstretchy)

I was mainly inspired by the dark woodgrain wall and the pops of yellow from the inspiration photo, and yes, you guessed it, I used Vintage Roses.
That set is definitely high in my ranks of the Stamp Greats.


Stamping the flowers was funny and easy, as was arranging them (read: I just piled them all together and stuck leaves in randomly). I knew I wanted to use this patterned paper from a Maggie Holmes paper pad, but I didn't know how I was gonna frame the flowers, as I didn't want to take away from the bold brown.
I eventually decided on pulling out an oldie but a goodie die set, Nestabilities Labels 4, and so that I only got a small pop of white, I die cut a window, using the two largest frames.
This technique isn't limited to die sets or dies of the same shape - you could even cut a circle, and then a heart or flower inside it!


I heat embossed the sentiment inside my frame, topped the roses off, and I was done! I will add a bit of forewarning on the sentiment though - I used the EK Success powder tool to make sure the embossing powder would only stick where I stamped the sentiment. It filled its duty admirably, but it left some traces of its own powder behind. I've found this is the case with other dark papers - the powder tool won't completely brush off and will leave some light residue.
So I would say to use the tool very lightly on dark cardstock, or go with some good old fashioned cornstarch, which works the same way.

Thanks for stopping in and God bless!

SUPPLIES

Cardstock: Michaels, Papertrey Ink
Stamps: Altenew "Vintage Roses"
Ink: Tim Holtz, Studio Calico
Patterned paper: Crate Paper - Maggie Holmes "Open Book"
Other: pearls (Darice), embossing powder (Hero Arts)

Tools: heat gun, Nestabilities Labels 4 dies, Cuttlebug

8.20.2015

Over the Edge // Throwback Thursday

While not turning out exactly how I envisioned, I still like the happiness of this card.


Looking back on this card, I think I would've stamped the airplane's flight pattern in a dark grey, so it didn't clash with the sentiment as much.
Still, those are nice clouds, floating off the card as they so carelessly do.
Good job, 2012 Clare.
*pats self on back*

SUPPLIES

Cardstock: Strathamore, Core-dinations
Patterned paper: Crate Paper "Storyteller"
Stamps: Papertrey Ink "Happy Trails"
Ink: Stazon
Other: sequins (Michaels)

Tools: Fiskars cloud punches

8.18.2015

Stamped Background Focus // Avery Elle

Hello, I'm here today with a card background made using two small image stamps.
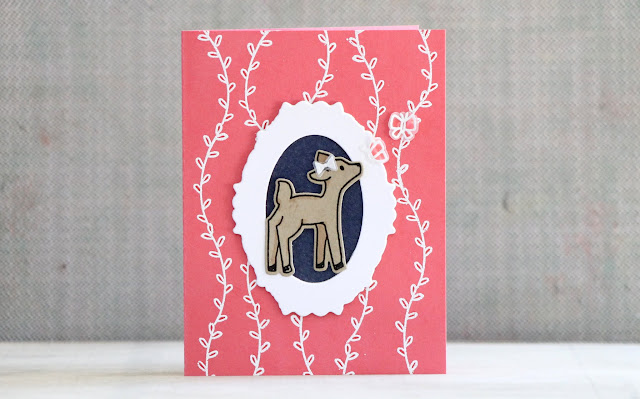
This card is for the AEI{heart}U Embossing challenge, with the entire embossed background created using the two small branch images from the adorable Storybook stamp set.
Seriously, can't stop using it.


I topped off the little fawn with an embossed bow, and added some embossed butterflies to give the fawn something to look at. Once I had heat embossed the butterflies, I flipped them over and colored their wings using a Distress Ink marker. After coloring, I zapped the butterflies once more with the heat gun, so that the marker coloring didn't smear.


I did some simple coloring on the fawn with a Memento Marker in Desert Sand. This is the best it gets from someone coloring impaired (i.e. me). ;)


I doubled up the white part of the frame, just to give a little dimension to the project. 


And guess what? I made a video!


That's it for me today! Thanks so much for stopping in and God bless!

SUPPLIES

Cardstock: Bazzill
Stamps: Avery Elle "Storybook", Lawn Fawn "Beep Boop Birthday"
Ink: Versamark, Versafine, Distress Ink, Memento
Other: embossing powder (Hero Arts)

Tools: Cuttlebug, Papertrey Ink Simply Jane die, Avery Elle Storybook die, Lawn Fawn Beep Boop Birthday die, heat gun

8.13.2015

Motion Stamping // Throwback Thursday

Trying out a stamping motion technique while using a poorly neglected Hero Arts stamp set.


This card would work perfectly for guys or gals! And man, I really loved those little Martha Stewart gems. Michaels came out with their own brand awhile back, but not colors I particularly liked, and they weren't quite as...mellow. *sigh*

Supplies

Cardstock: LSS
Patterned paper: SEI "Field Notes"
Stamp: Hero Arts "Past Times"
Ink: Stazon, Tim Holtz
Other: gems (Martha Stewart), die cut (Basic Grey)

8.12.2015

Layered Heat Embossing // My Favorite Things

Early morning dash to Mass, and after celebrating St. Clare's feast day with lots of sugary donuts, I'm starting to come down off my sugar high.
So hopefully this post is coherent, because everything in me is screaming for a nap (naps are the best.) But I decided to struggle on for the sake of the faithful readers out there who have probably been out of their minds with worry during my almost-one-week blogging absence.
*chuckle*
I really do need to take that nap.

This card is for the MFT Color Challenge #26 and the Simon Says Stamp Wednesday challenge Food or Drink.


I used the delectable (sorry, couldn't help myself) Piece of Cake stamp set. I LOVE the sentiments in this stamp set ("Let's celebrate your existence with cake" - *chuckle*), but for the sake of the design, I used another MFT favorite (now retired - sorry!), Framed Greetings, for the sentiment.
I plan on adding "cake is my other favorite thing" (or something of that gist) inside the card.


The background was stamped using Brilliance Moonlight White and a little present image from the freakin' adorable Birthday Bears stamp set.
This cake was so fun to heat emboss and use up some colored embossing powders! I actually heat embossed the candles on the already heat embossed pink icing - super fun, but just make sure you put lots of anti-static powder (or cornstarch) on the first embossed layer before going in for seconds. ;)


It's hard to tell in the first photo, but I added some Stickles for the candle flames and the filler icing. Adds a little zing! to the cake.


Okay, well, my mind has officially stopped cooperating with me, so I'll leave you with this strange post and bright card.
Goodnight.
I mean, goodbye!

*snore*

SUPPLIES

Cardstock: Papertrey Ink, Bazzill
Stamps: My Favorite Things "Piece of Cake", "Framed Greetings" and "Birthday Bear"
Ink: Versamark, Brilliance Moonlight White
Other: embossing powders (Hampton Arts), washi tape (Target), Stickles

Tools: heat gun, 1" circle punch

8.06.2015

Fabric Window // Throwback Thursday

This card was published in Paper Crafts and Scrapbooking about two or three years ago.

FABRIC WINDOW

A card I quickly put together last night using a negative die cut from a previous card, and some fun fabric a friend sent me.


Some glitter tape adds some extra spice (or should I say sparkle?) to the project.

Thanks for stopping in and God bless!


8.02.2015

Stamp Smooching // Papertrey Ink

So quick disclaimer - I had a crazy week studying for my calc final (which went really well!), so this card and it's photos were made/taken a lot quicker than my typical snail pace, so the photos at the very least aren't up to par today. However, I do need to get this in before the challenge deadline, so you will be subjected to the subpar today, but don't worry, I won't make this a regular thing. ;)

This card was made for this weeks Papertrey Ink Make It Monday challenge and Simon Says Stamp Wednesday Anything Challenge.


In her instructions on texture kissing, Lizzie Jones recommended not using juicy inks - well, I was fresh out of non-juicy inks in the colors I wanted to use, so I had to use my juicy Studio Calico Color Theory inks.
The result was a maybe not so crisp first impression of the technique, but the Color Theory inks work really well for generation stamping, and so I was able to get a second impression of the texture kissing.


I'll be sending this on over to my brother and his family, who just moved to Utah (blah). It's kind of belated, but I still think it's fun to receive handmade cards in the mail, late or otherwise.


I didn't have any orange cardstock that matched the little chick color, so I used the ink itself to color a short strip of cardstock, then added a LOT of powder so that when I stamped my sentiment in Versamark, the embossing powder would only stick to the sticky stamped sentiment.

I'm off to beat my siblings in a game of euchre - enjoy the rest of your Sunday!

***********************************
Cardstock: Pat'Catans
Stamps: Papertrey Ink "Wet Paint", "Postmarks" and "On the Farm"
Ink: Studio Calico, Versamark
Other: embossing powder (Hero Arts)

Tools: heat gu